How to use the Transit desktop trip planner
Here's what this article covers:
- Quick start guide: Plan a trip in three easy steps
- Transit desktop trip planner: Complete A-Z guide
- Common questions & troubleshooting
Quick start guide: Plan a trip in three easy steps
This mini-guide shows you the fastest way to plan a trip right now.
Define trip origin and destination locations
- Click on the Origin box. Then click on "Current Location" or start typing a location and click on the relevant result from the list below.
- Then click on the Destination box. You can plan a trip to where you are by clicking on "Current Location", or start typing a location and then click on the relevant result from the list below.
Compare trip options
Once you’ve entered an origin and destination for your trip, Transit will generate one or more trip options on the left-hand side of the screen.
Each trip option displays the total travel time in minutes.
You can click a trip option on the left-hand side of the screen or on the map to display step-by-step instructions and highlight the route on the map.
You have now planned a trip. For more details on all features of the Transit desktop trip planner, continue reading the full guide below👇
Transit desktop trip planner: complete A-Z guide
This guide will help you learn how to use the Transit Desktop Trip Planner to plan your journey from start to finish.
Understanding your screen
When you open the Trip Planner, your screen has two main parts: the planning panel and the interactive map.
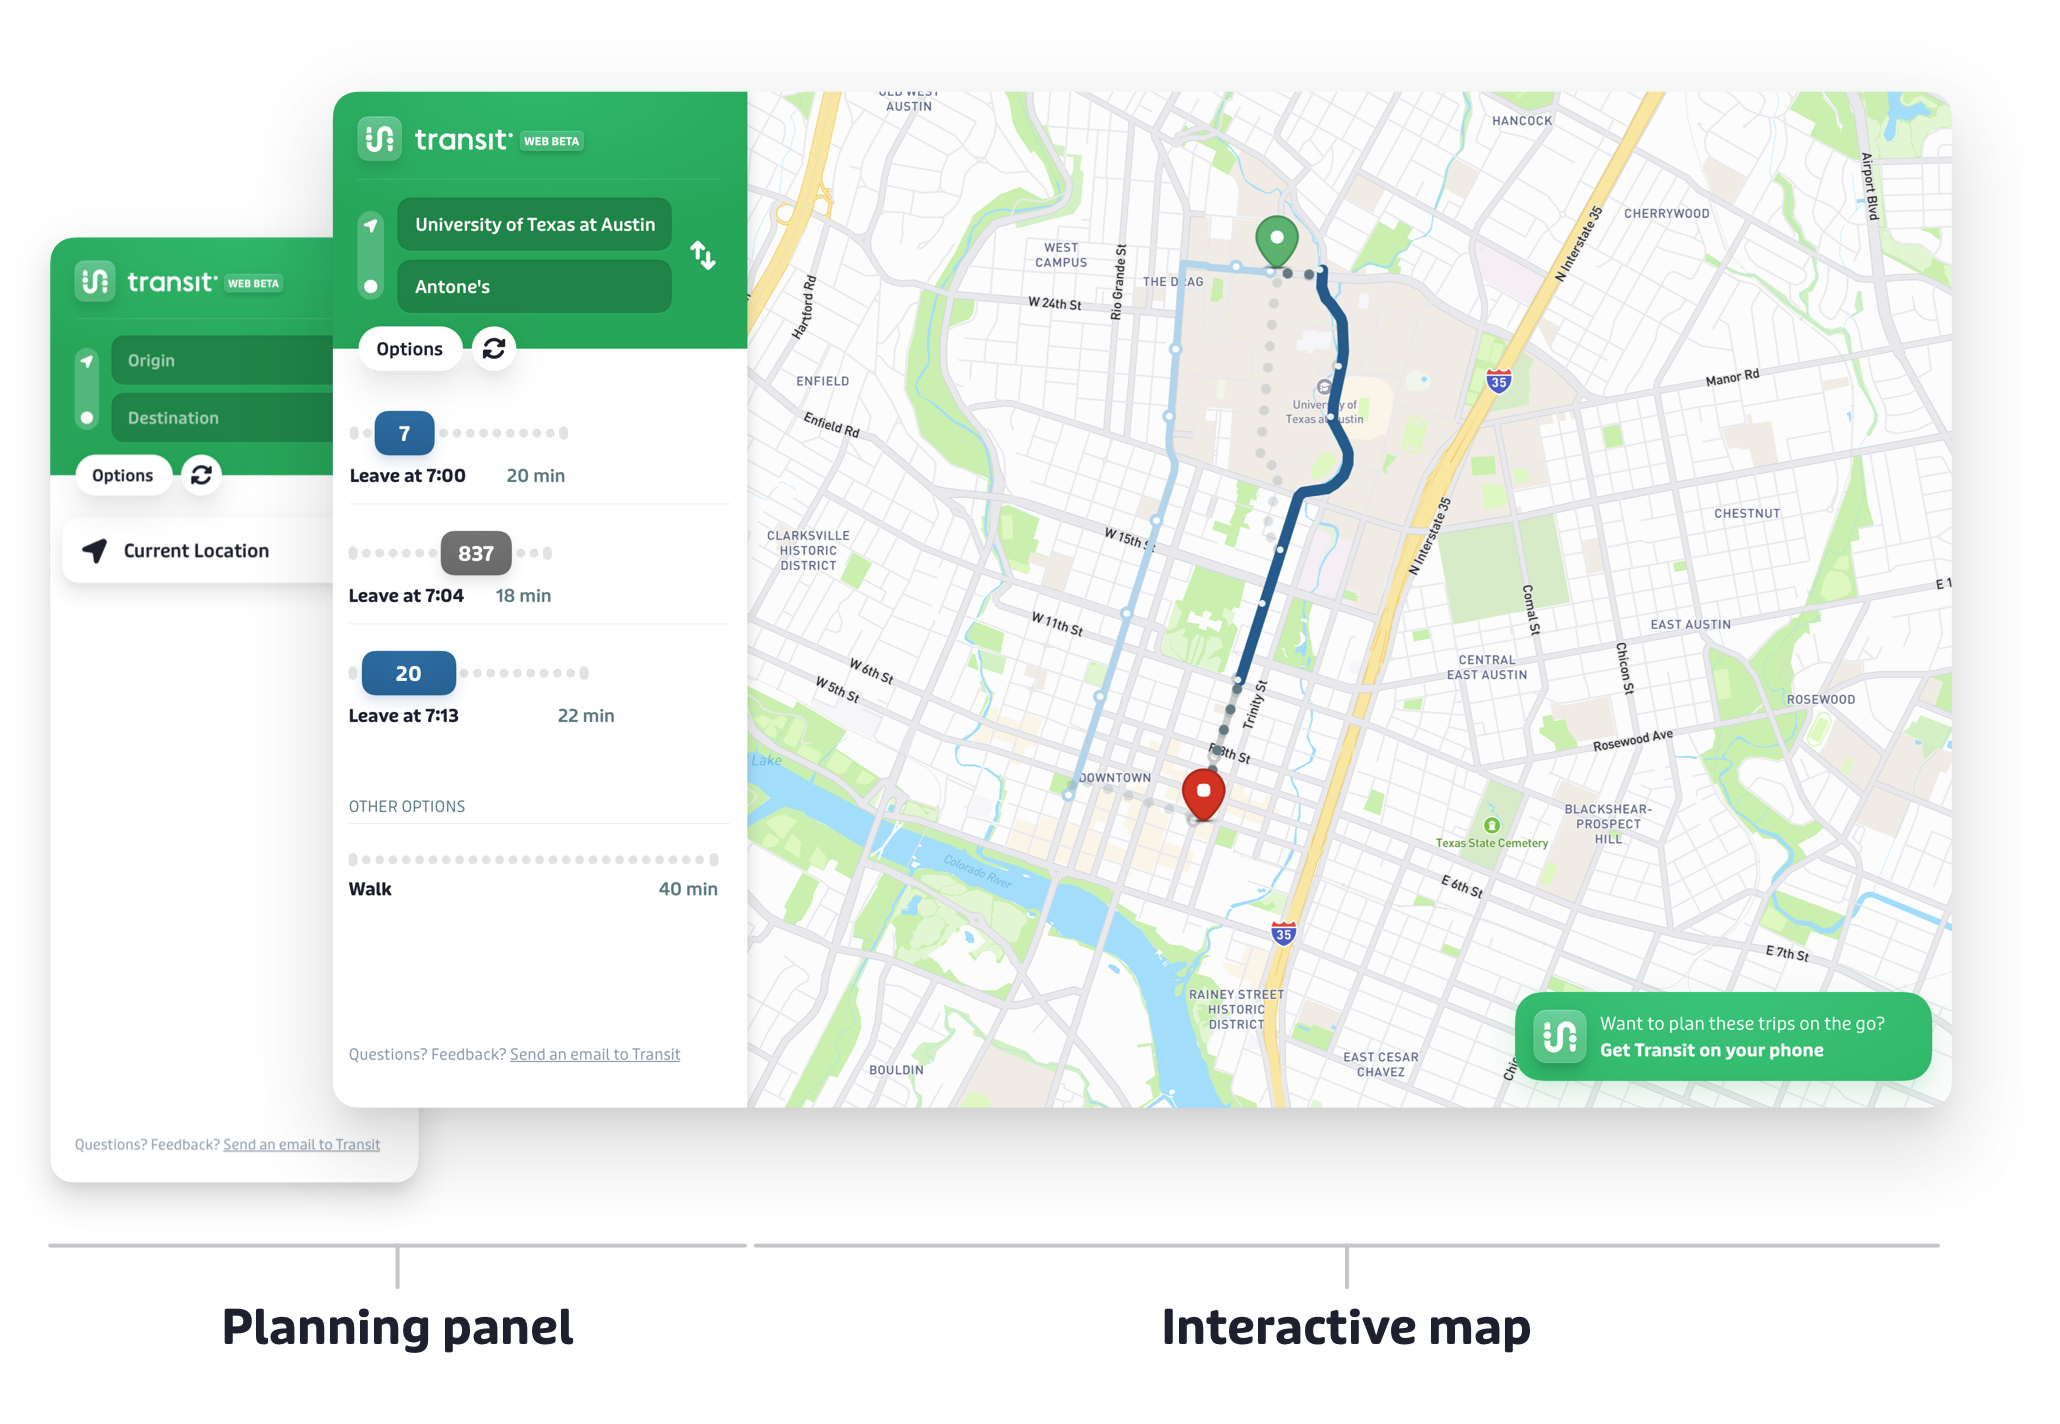
The planning panel
The planning panel on the left-hand side of the screen is your control center. Here, you can define the origin and destination locations of your journey, compare various trip options, select and view step-by-step instructions for a given trip option, and access the options panel to configure web trip planner parameters.

Clicking on "Options" brings up the options pane, where you can configure a given departure or arrival time for your journey, as well as select optional accessibility parameters. These parameters in the options pane will influence the trip options generated by the trip planner.
The interactive map
The interactive map on the right-hand side of the screen shows a map of the area near your location, or your transit agency’s area of service. Scroll into the map for more-precise local details, or scroll out of the map for a broader picture of the area.
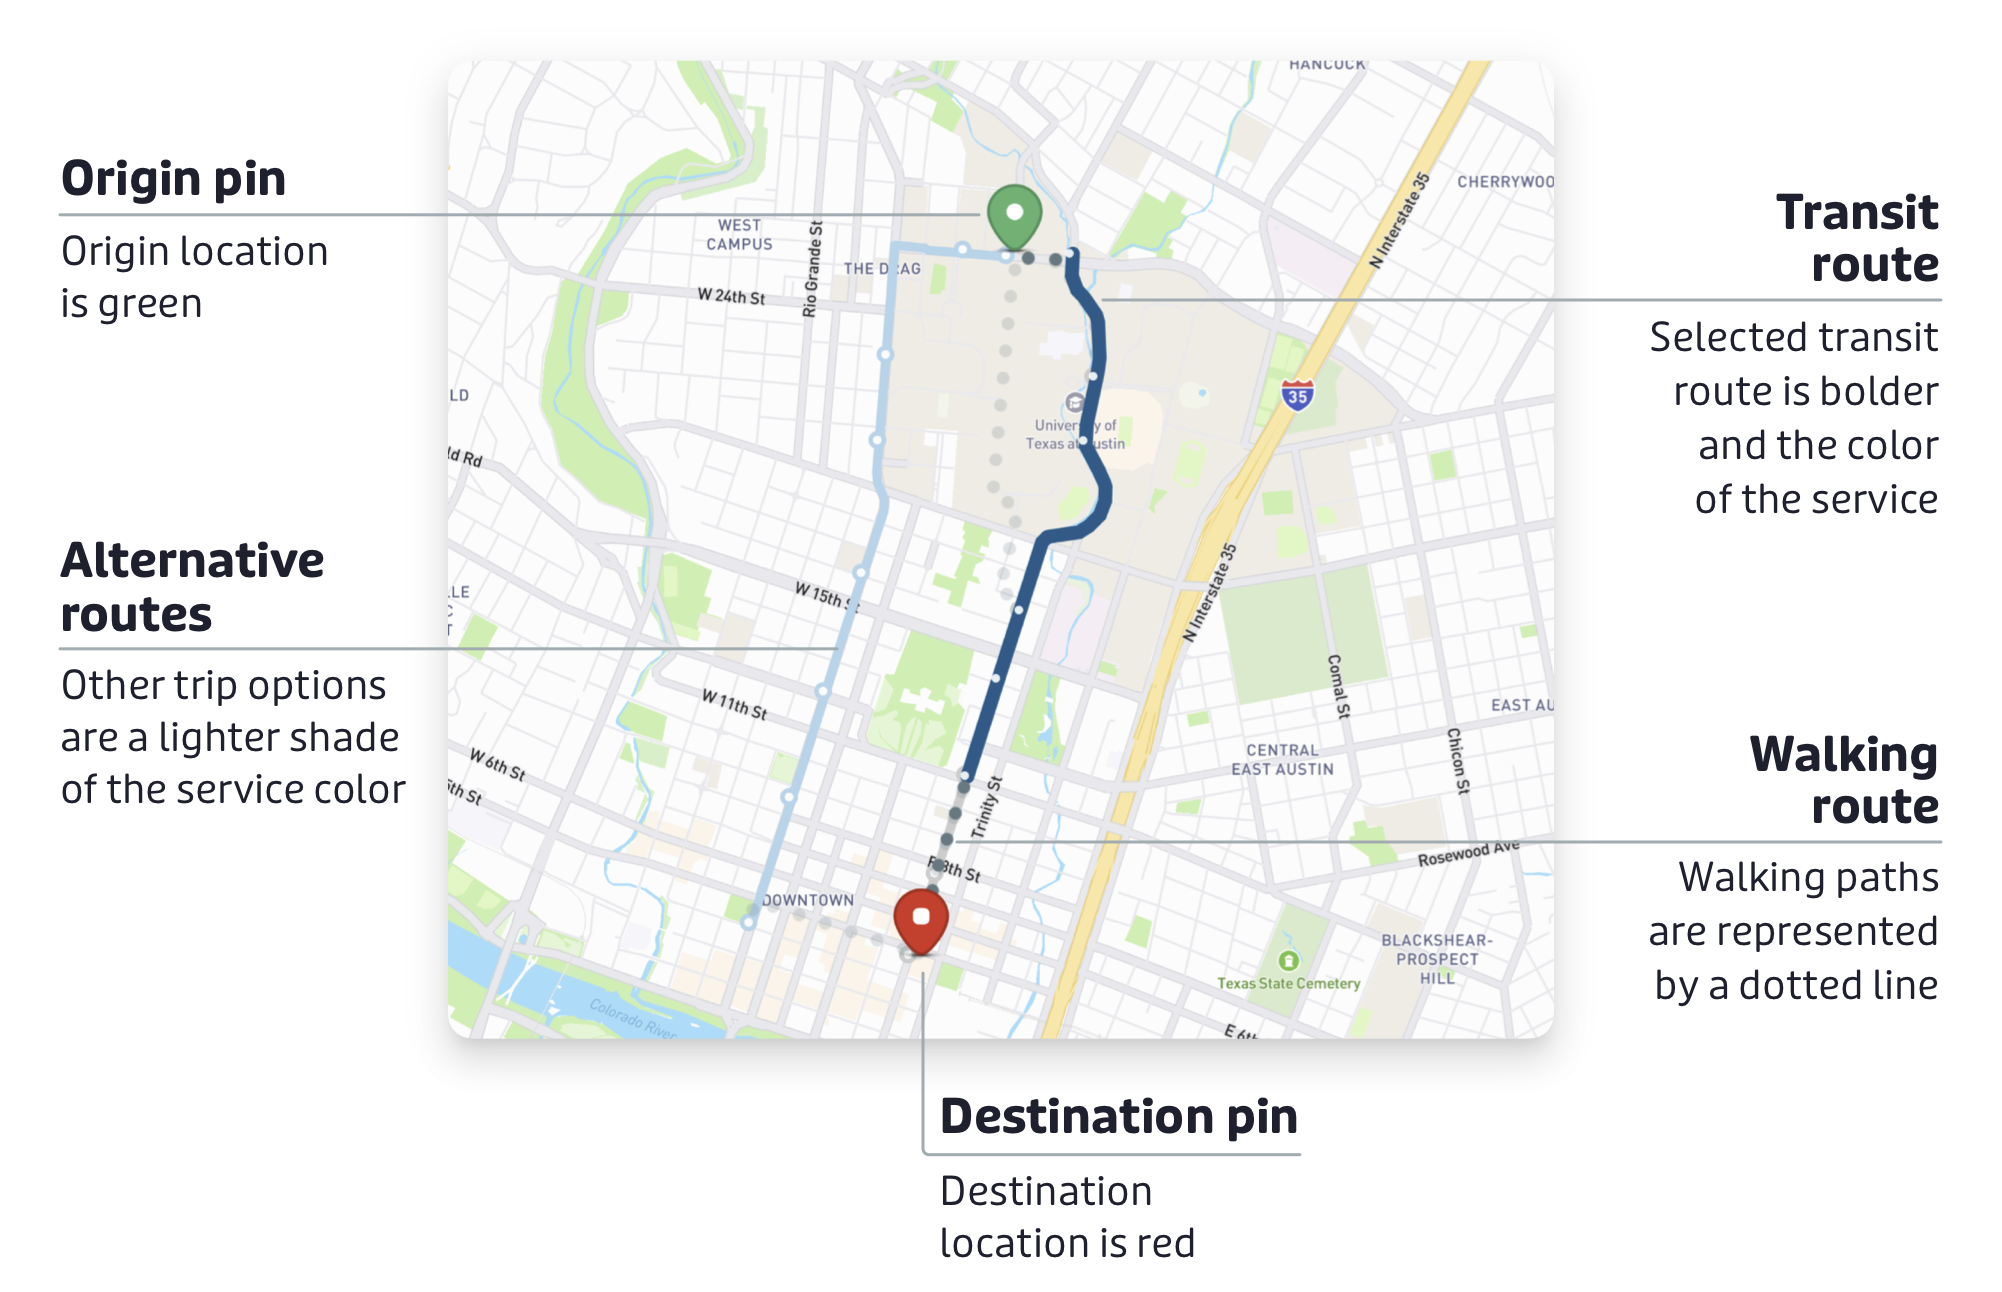
When you plan a trip, clicking on any given trip option will show the entire trip option on the interactive map, including the origin location (green pin), destination location (red pin), walking directions to and from transit stops, and walking directions for any transfers.
Planning your trip in detail
Define origin and destination location
To begin, you need to tell the planner where your trip will start (origin location) and end (destination location).
There are three different ways to define your origin and destination locations:
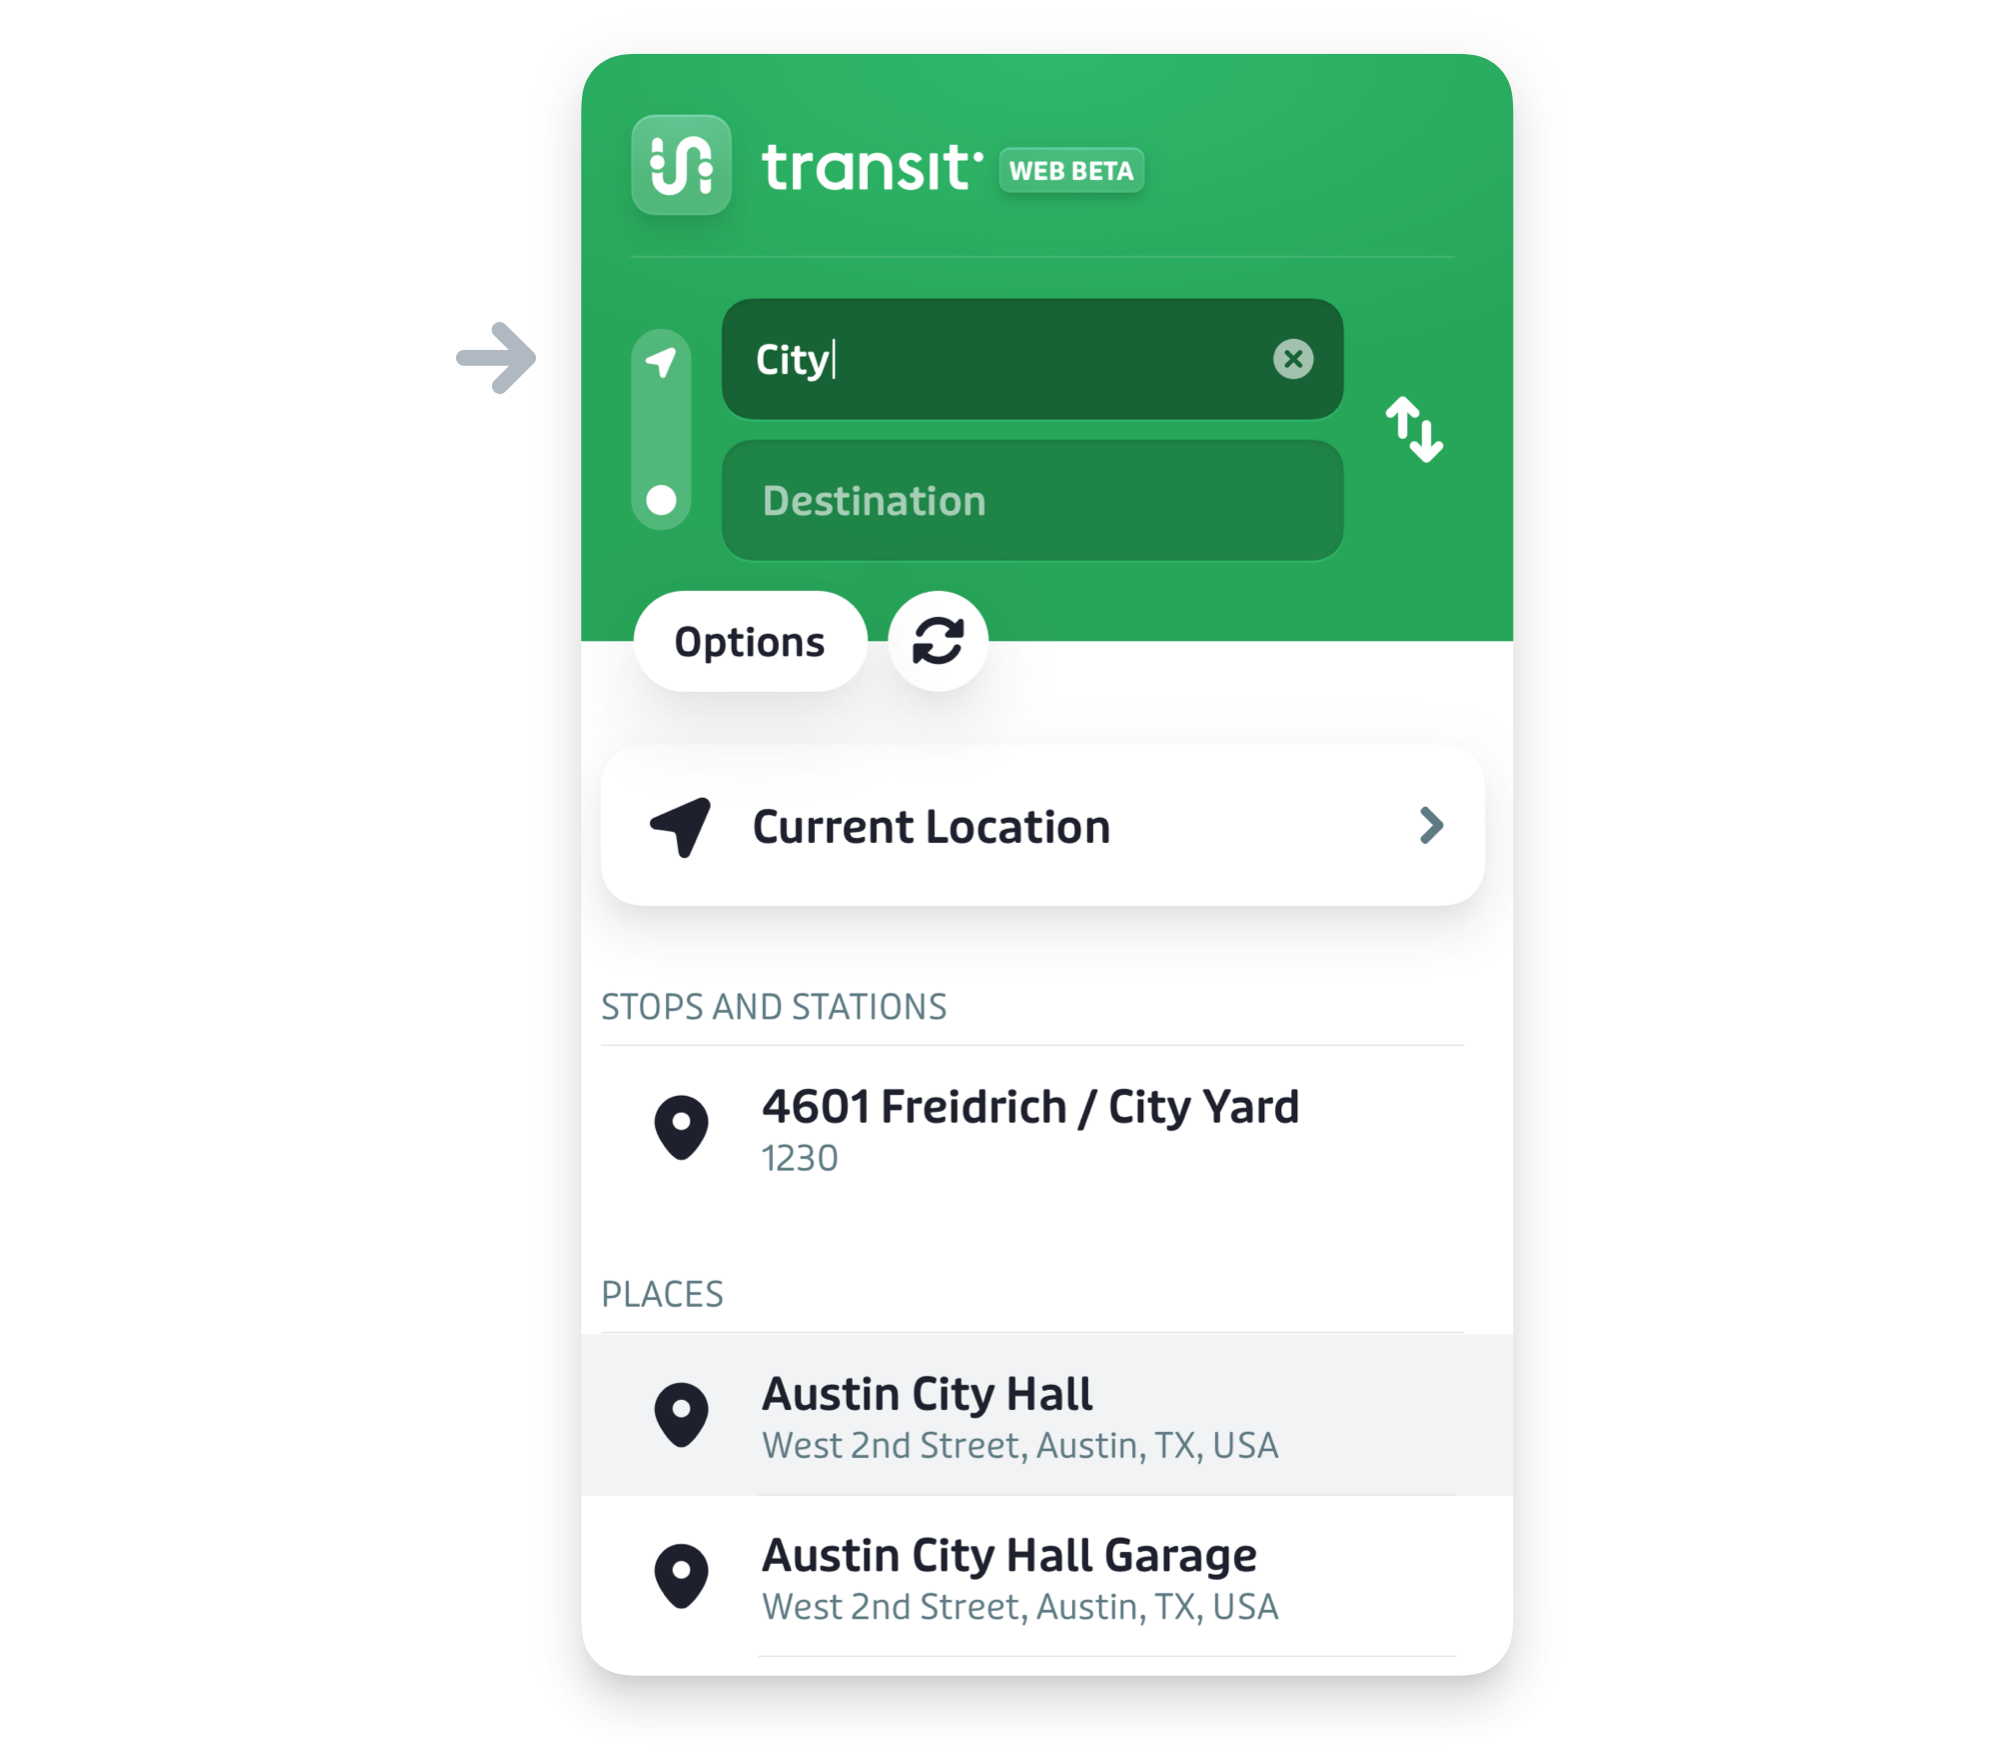
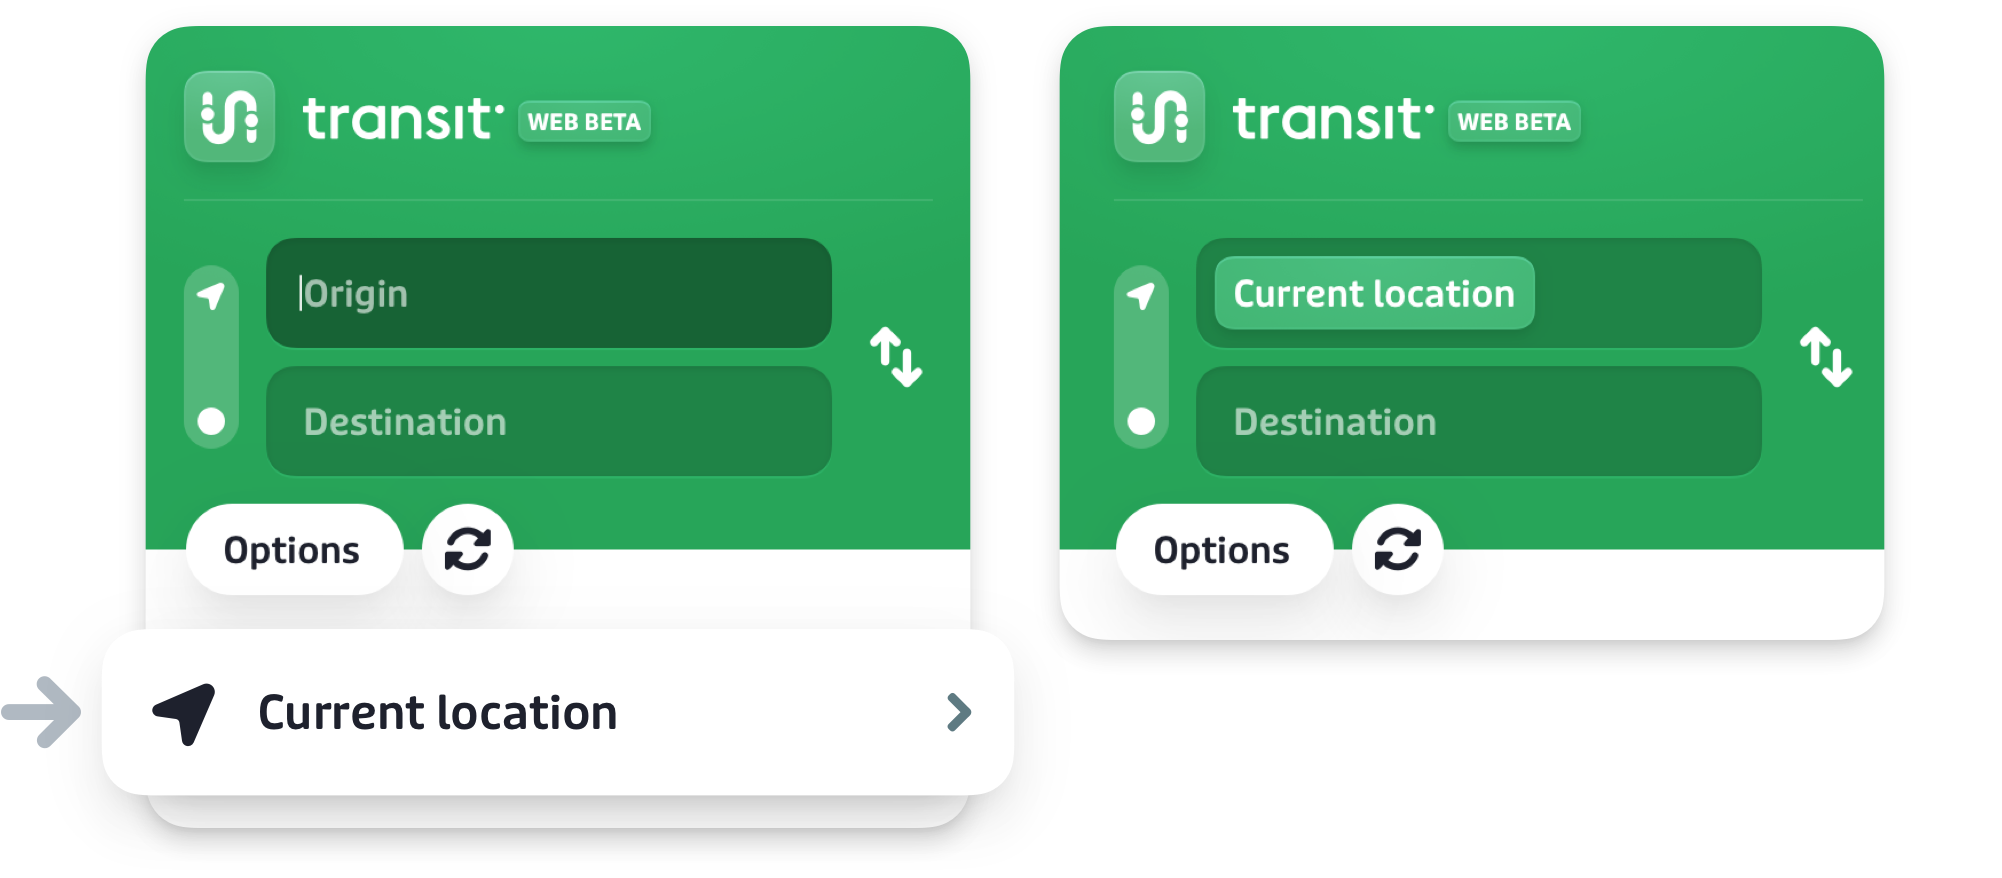
Define origin or destination location using current location
- In the planning panel at the top-left of your screen, click on the origin or destination box.
- Your current location will automatically appear in the trip planner results area.
- Click on current location in the trip planner results area to define your origin or destination location as your current location.
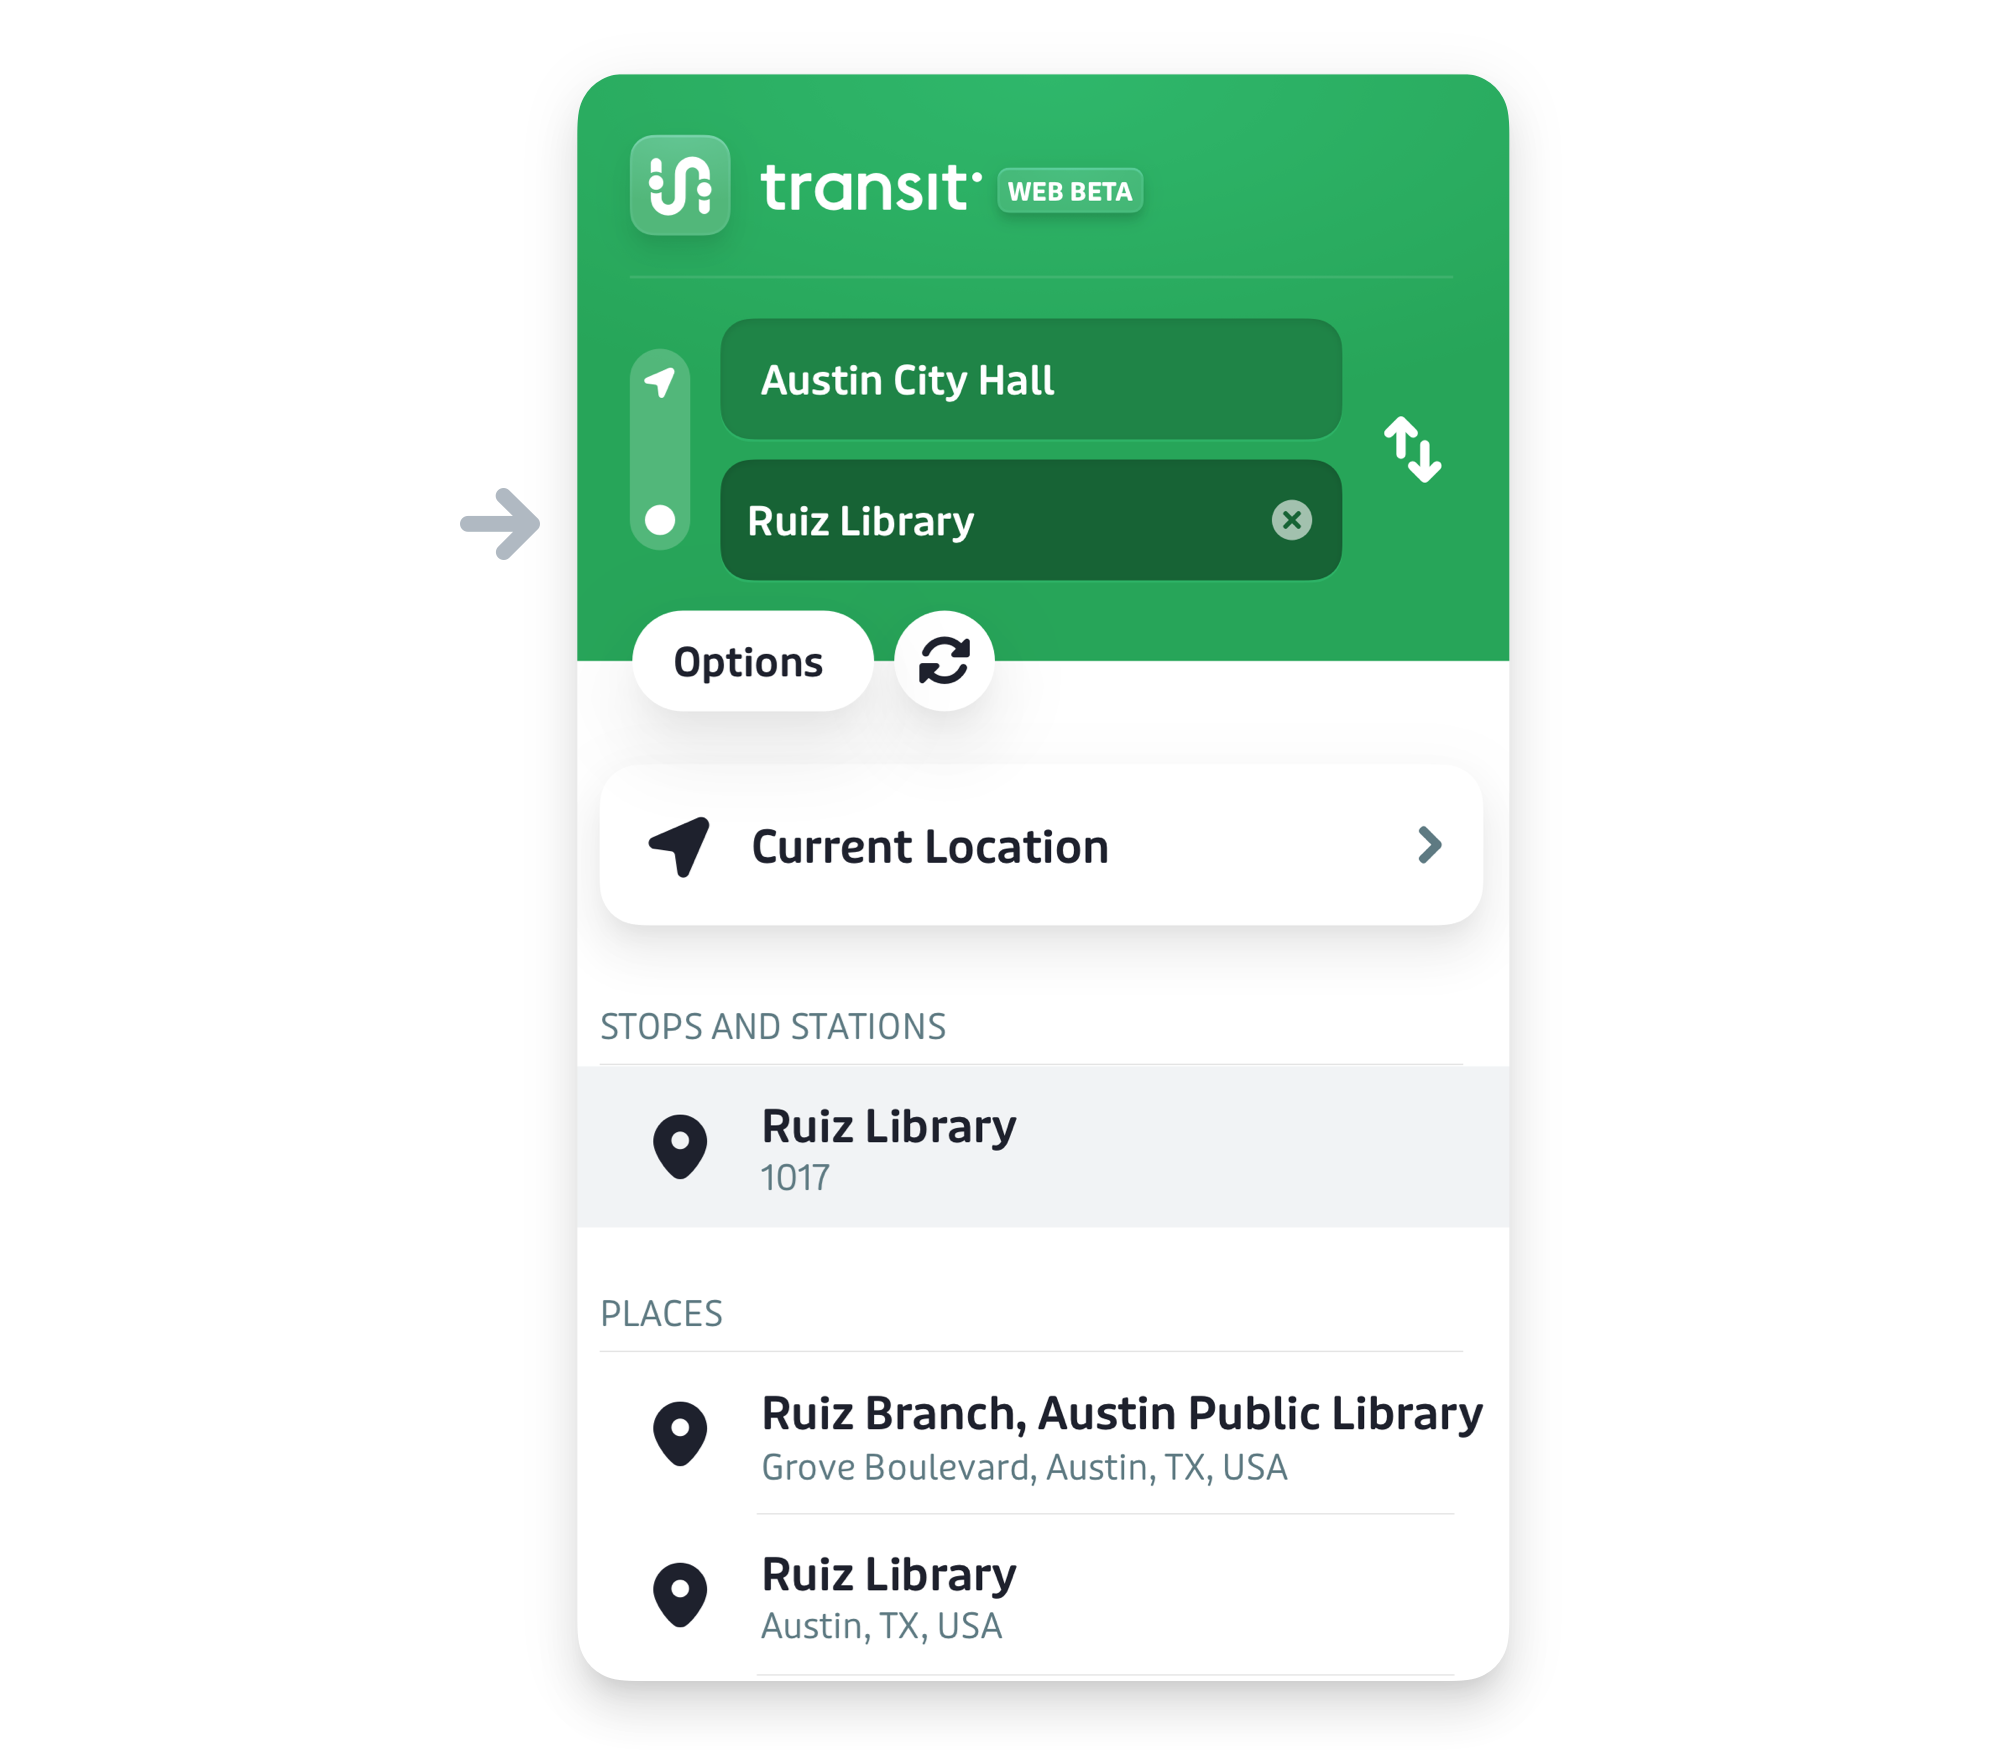
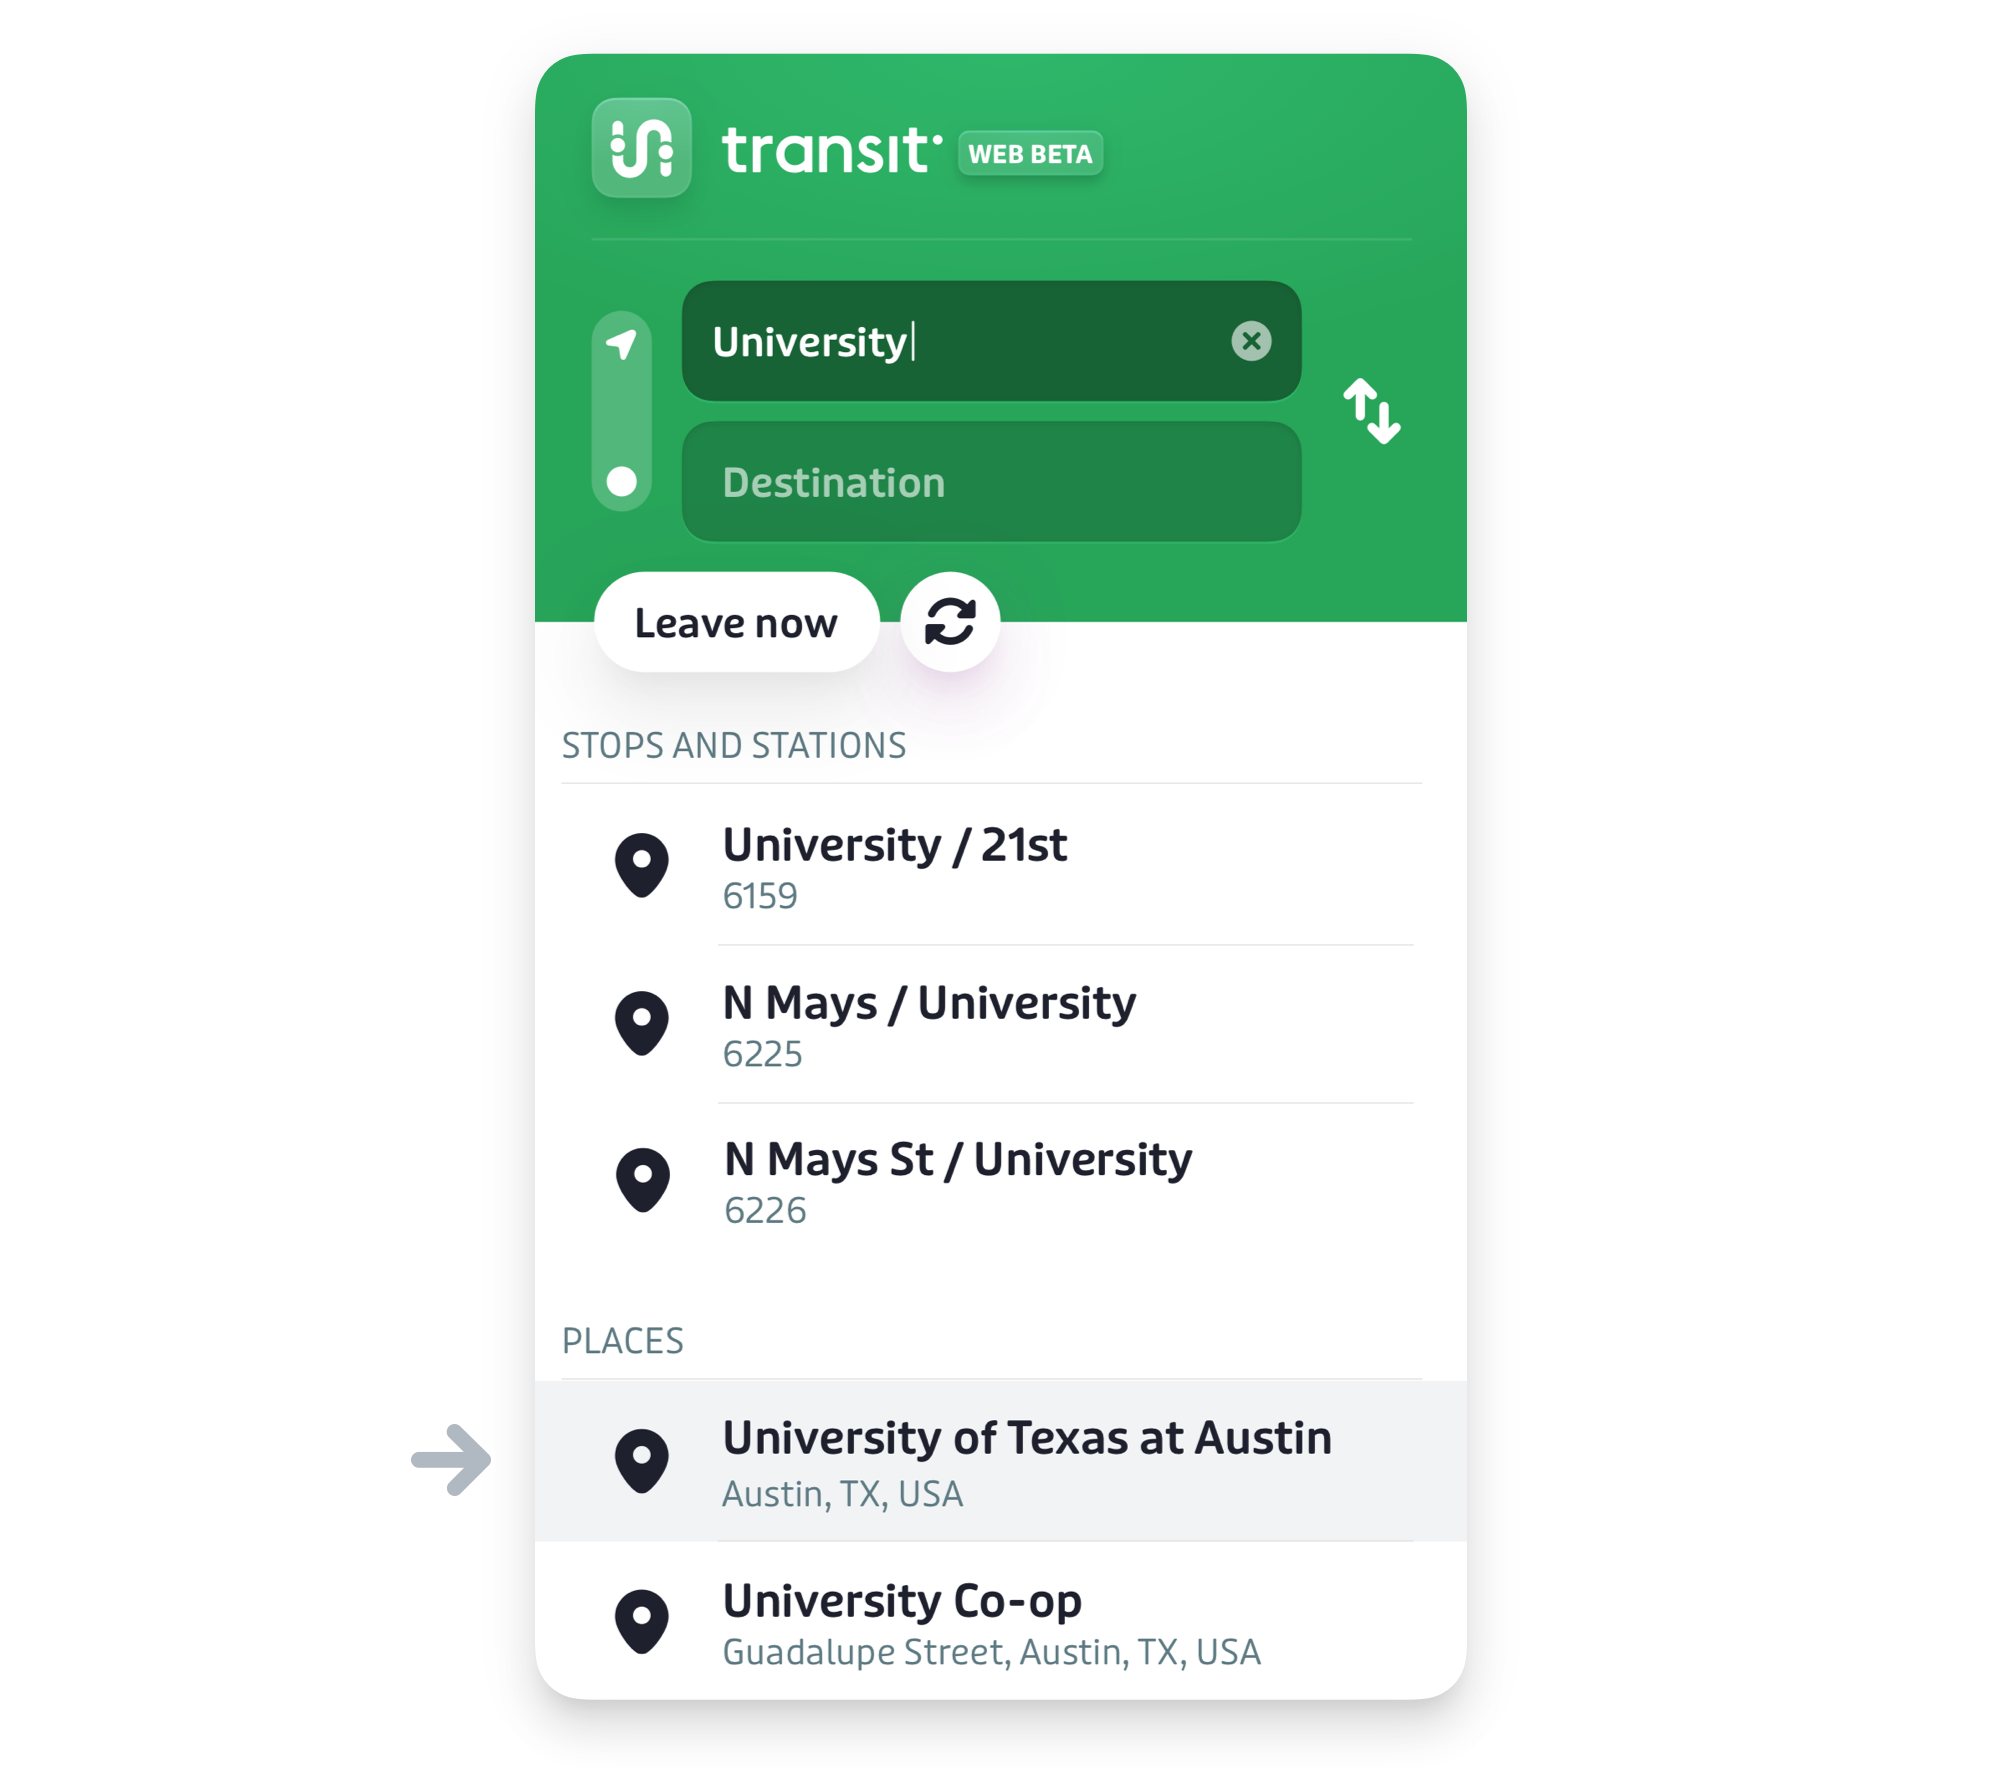
Define origin or destination location using search & select
- In the planning panel at the top-right of your screen, click on the origin or destination box.
- Start typing a location in the origin box. You can type the name of a point of interest, a street address, or a stop number.
- As you type, location suggestions based on your input will appear in the results. These location suggestions are organized into lists of stops and stations (transit stops), and/or places (local street addresses and points of interest).
- Click on the correct location suggestion in the results area to define your origin or destination location.
Define origin or destination location by clicking on the interactive map
- In the planning panel at the top-right of your screen, click on the origin or destination box.
- Then use the interactive map to find the desired location. You can click and drag to pan the map, or zoom in or out with your mouse or trackpad.
- Once you have found the correct location, click it to define it as the origin or destination.
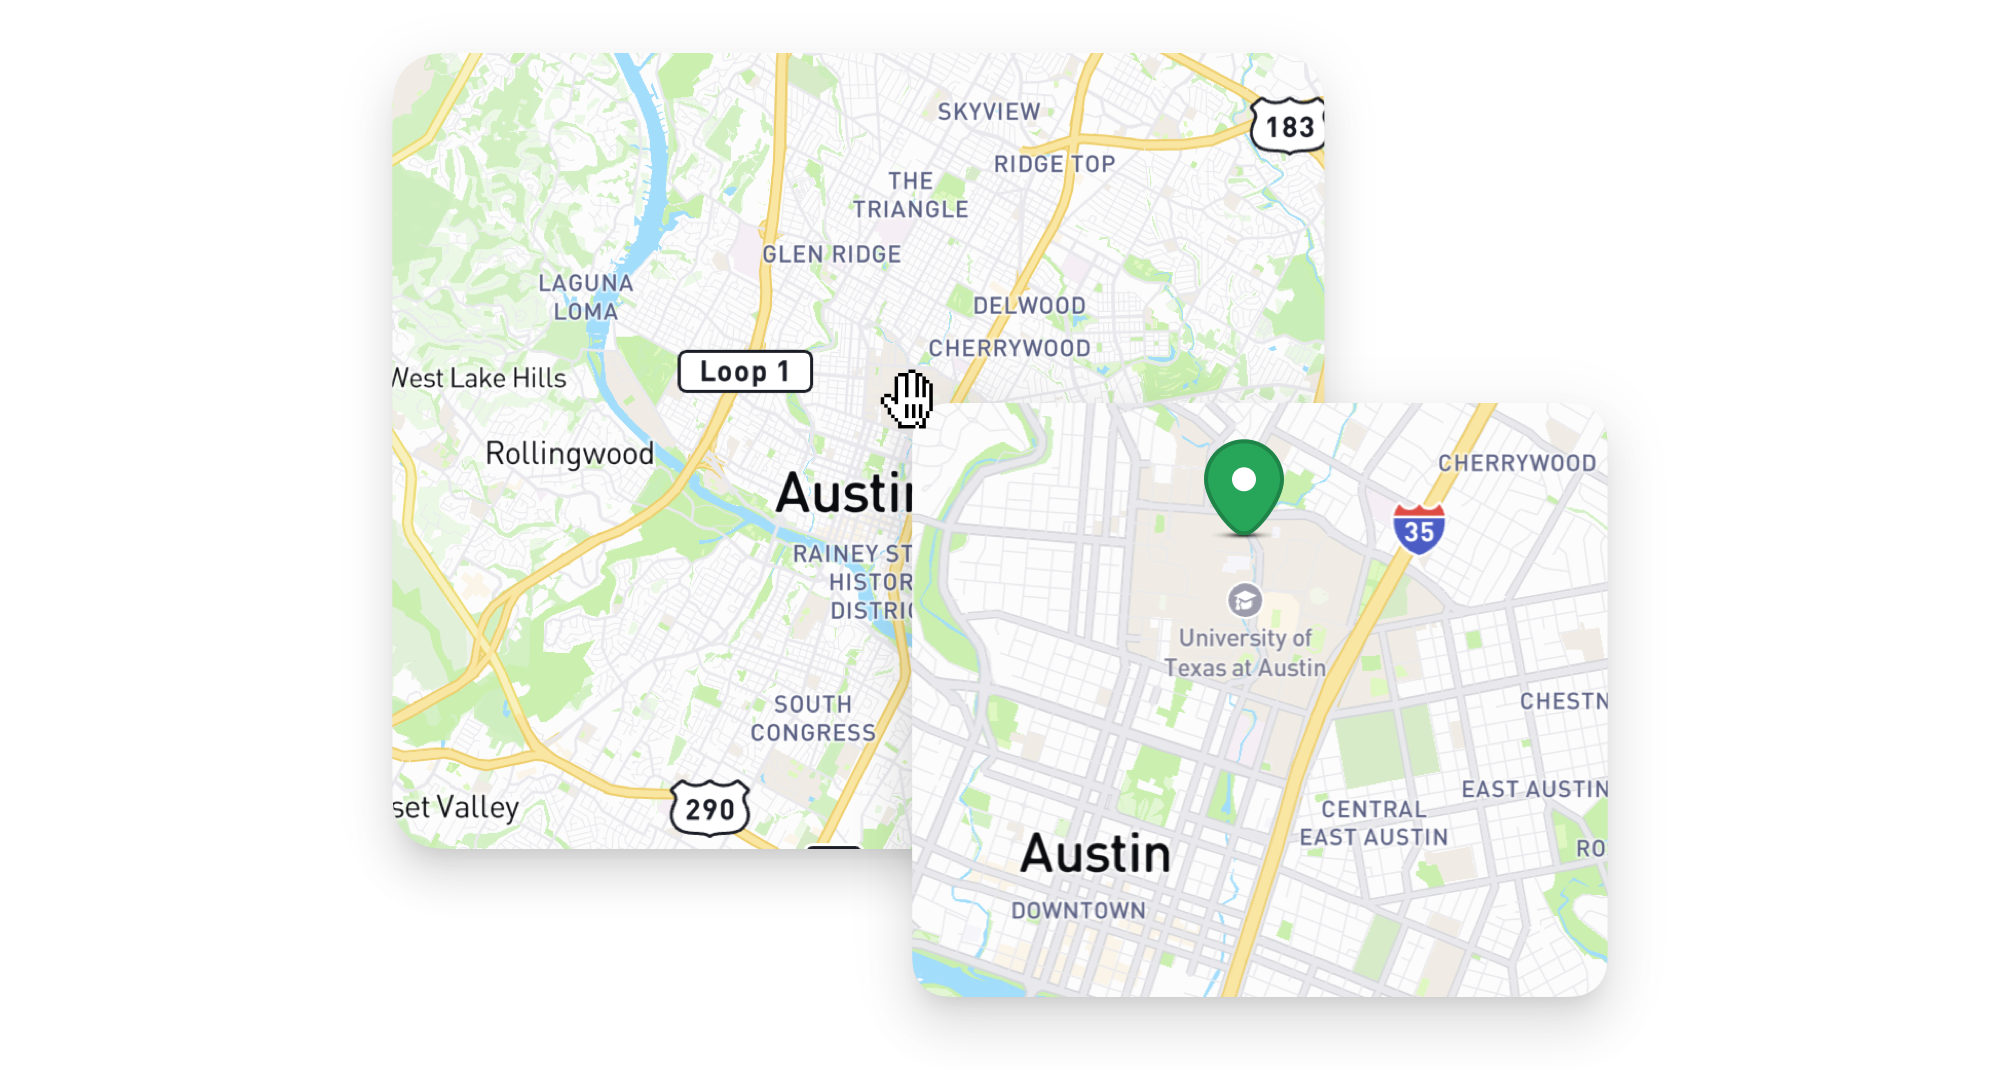
Your origin will appear as a green pin on the interactive map; your destination will appear as a red pin.
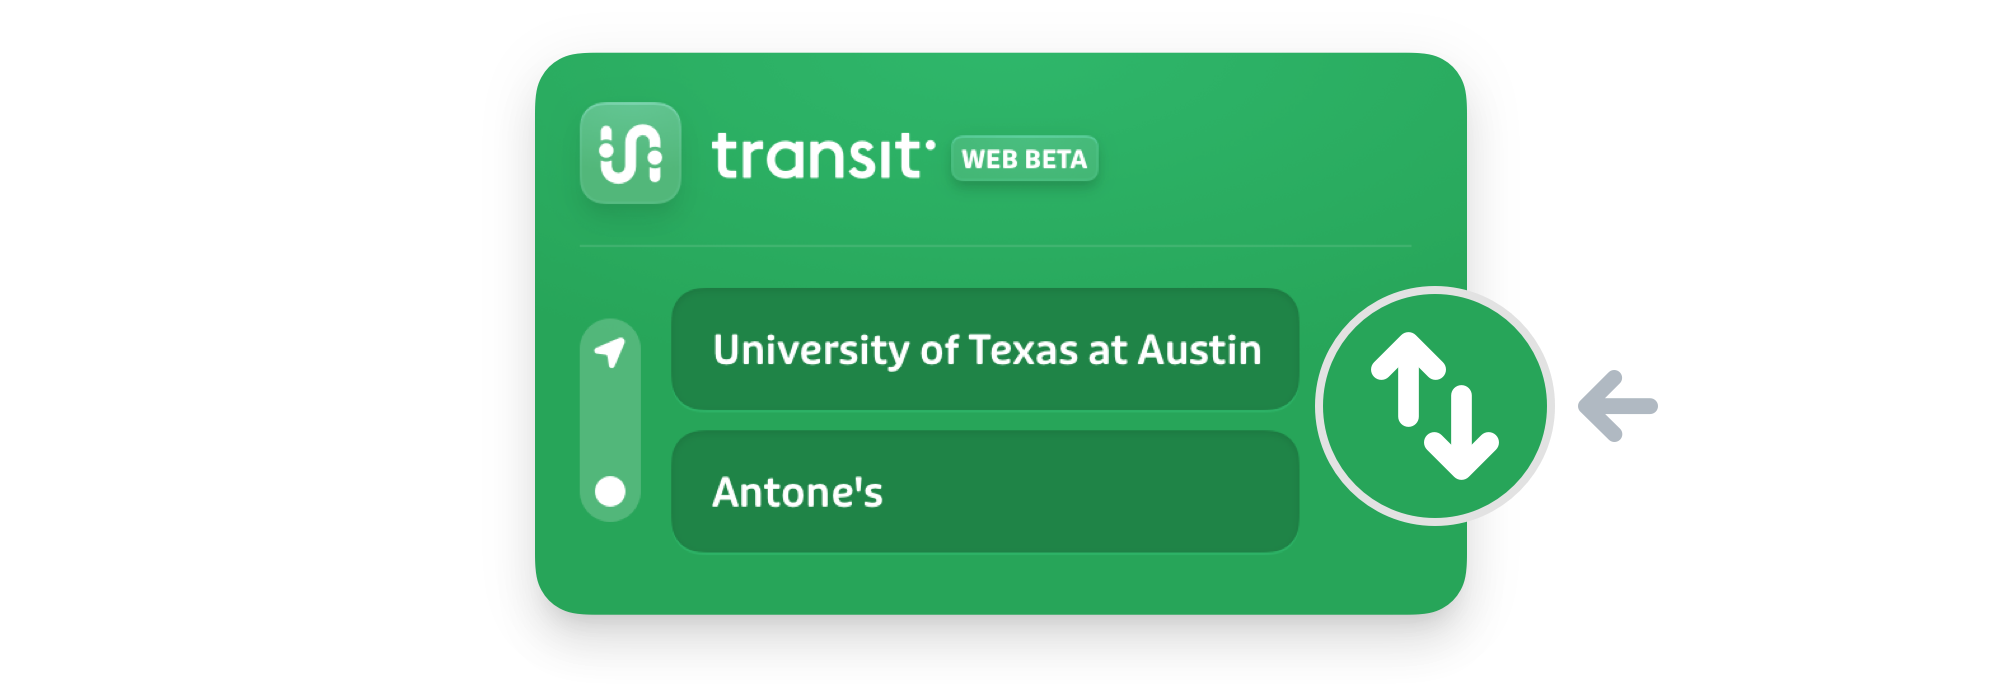
Pro tip: how to swap origin and destination locations
Once you have defined your origin location and your destination location, it’s possible to swap them, i.e. to plan a return trip.
To do so, just click the swap icon, located to the immediate right of the origin and destination boxes in Planning Panel at the top-left of your screen.
Your origin and destination will be swapped and the trip planner will provide new trip options for the reverse of your original trip.
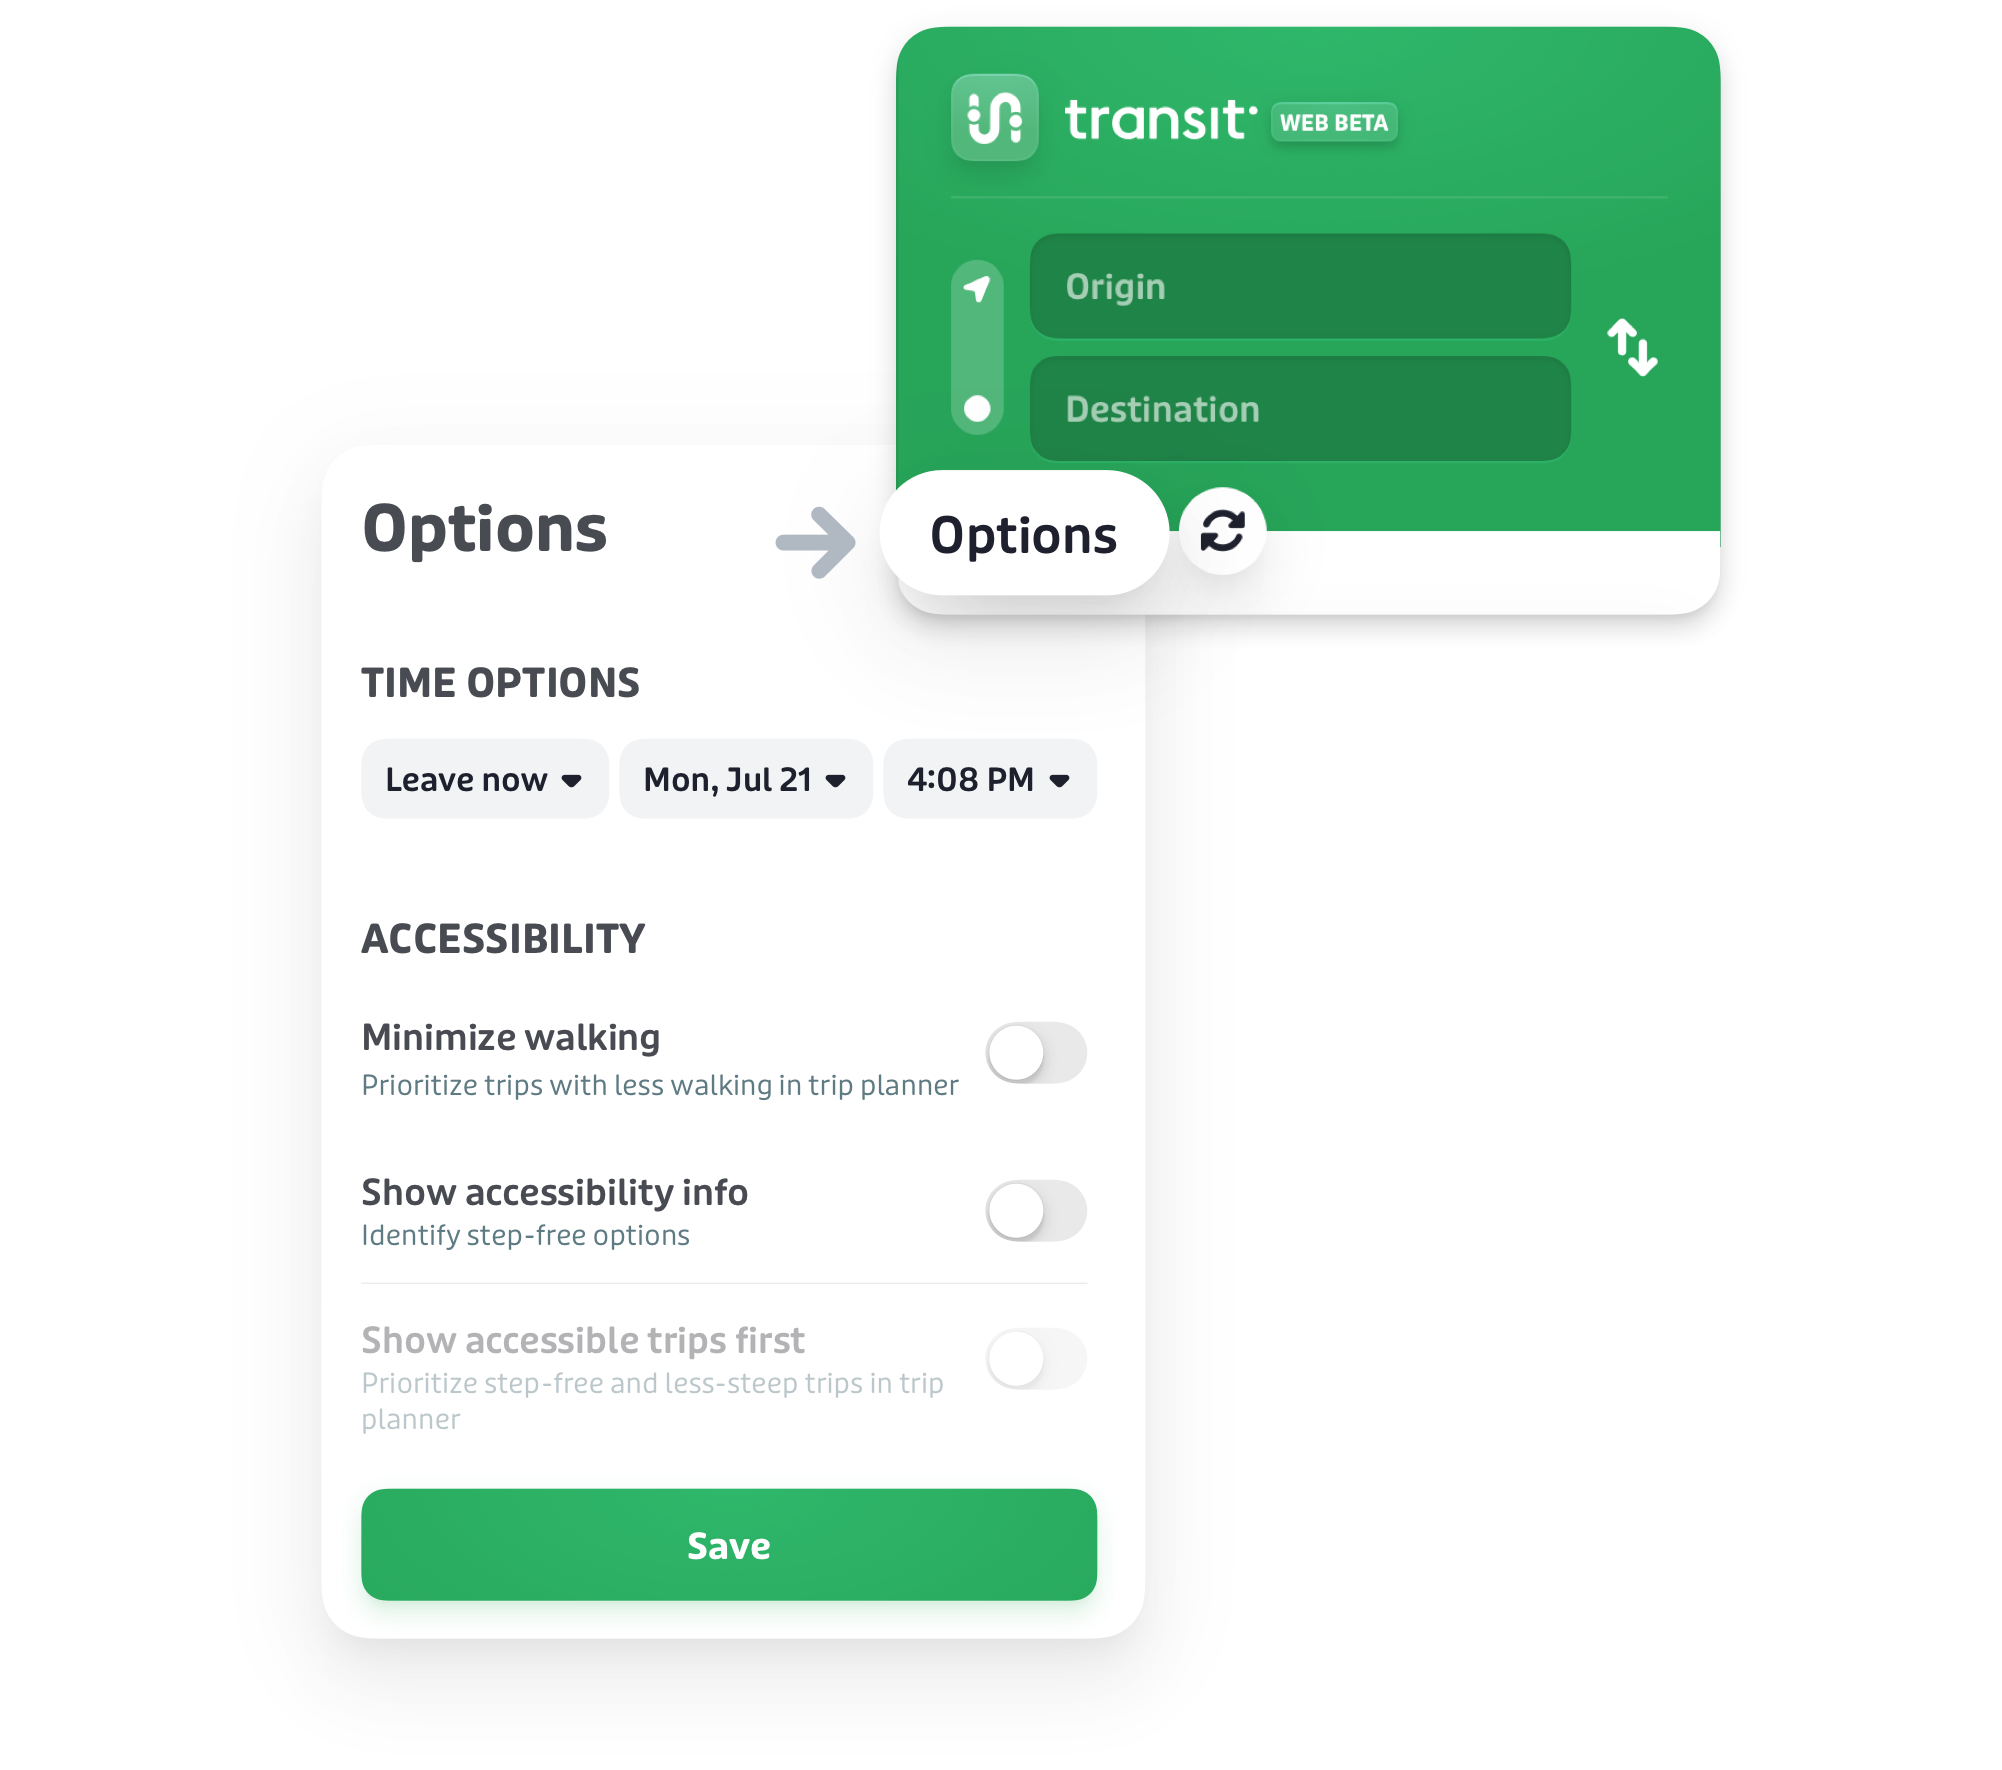
Define departure or arrival time
To define the time parameters for your journey, click on "Options".
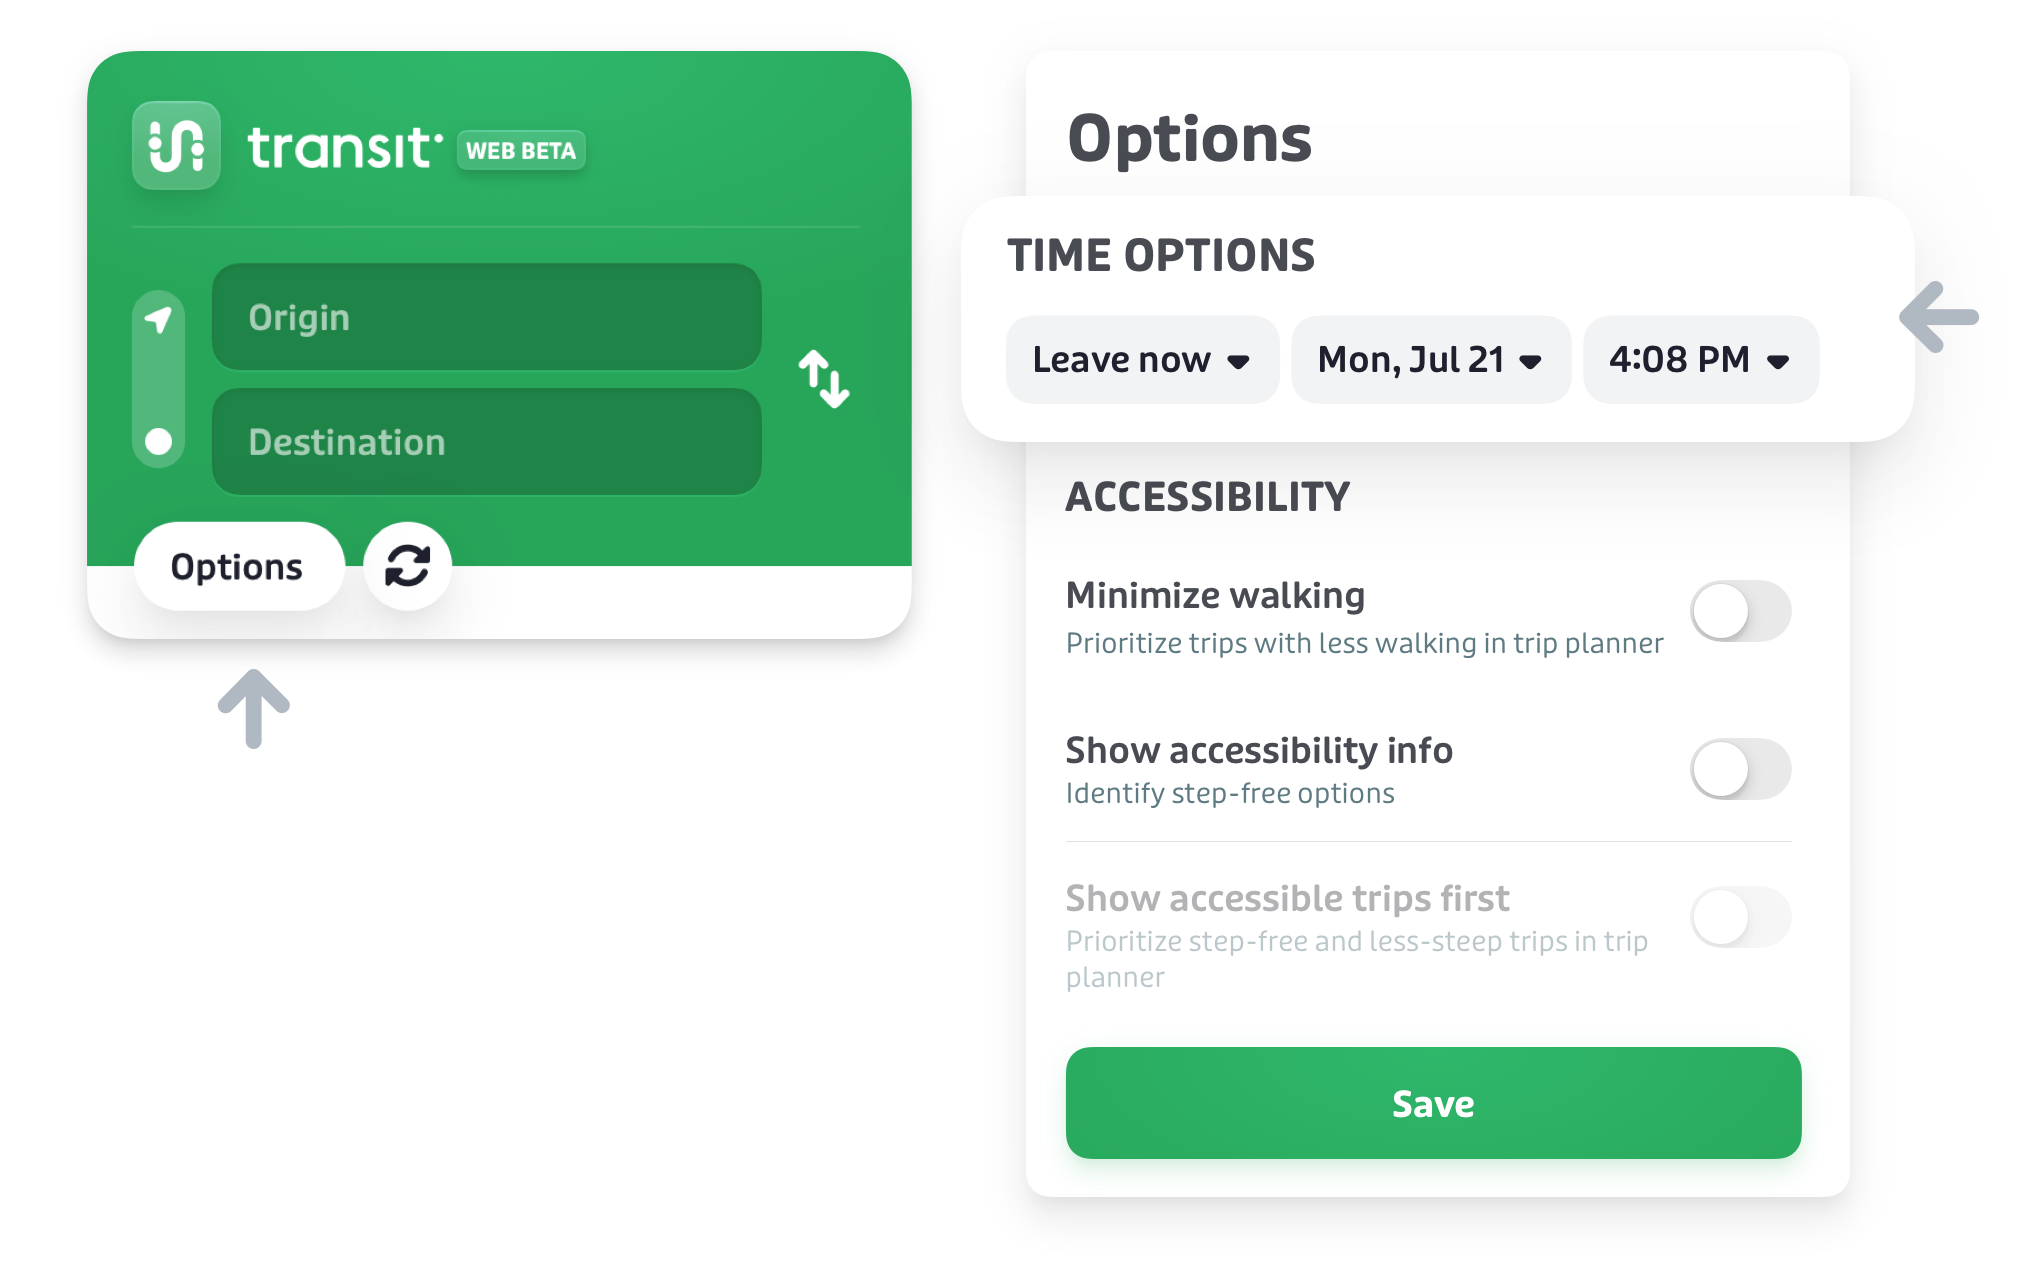
From here, you can select one of three options:
- "Leave now" (default): looks for trips that are leaving right away. This is the best option if you’re ready to leave.
- "Leave at": looks for trips departing after a set time.
- "Arrive by": looks for trips that arrive at the destination before a set time.
If you’ve selected "Leave at" or "Arrive by", use the date and time pickers to set the correct time and date. Then click "Save". The trip planner will then recalculate your trip according to your specified arrival or departure time.
Define accessibility parameters
Accessibility options are accessed by clicking on "Options".
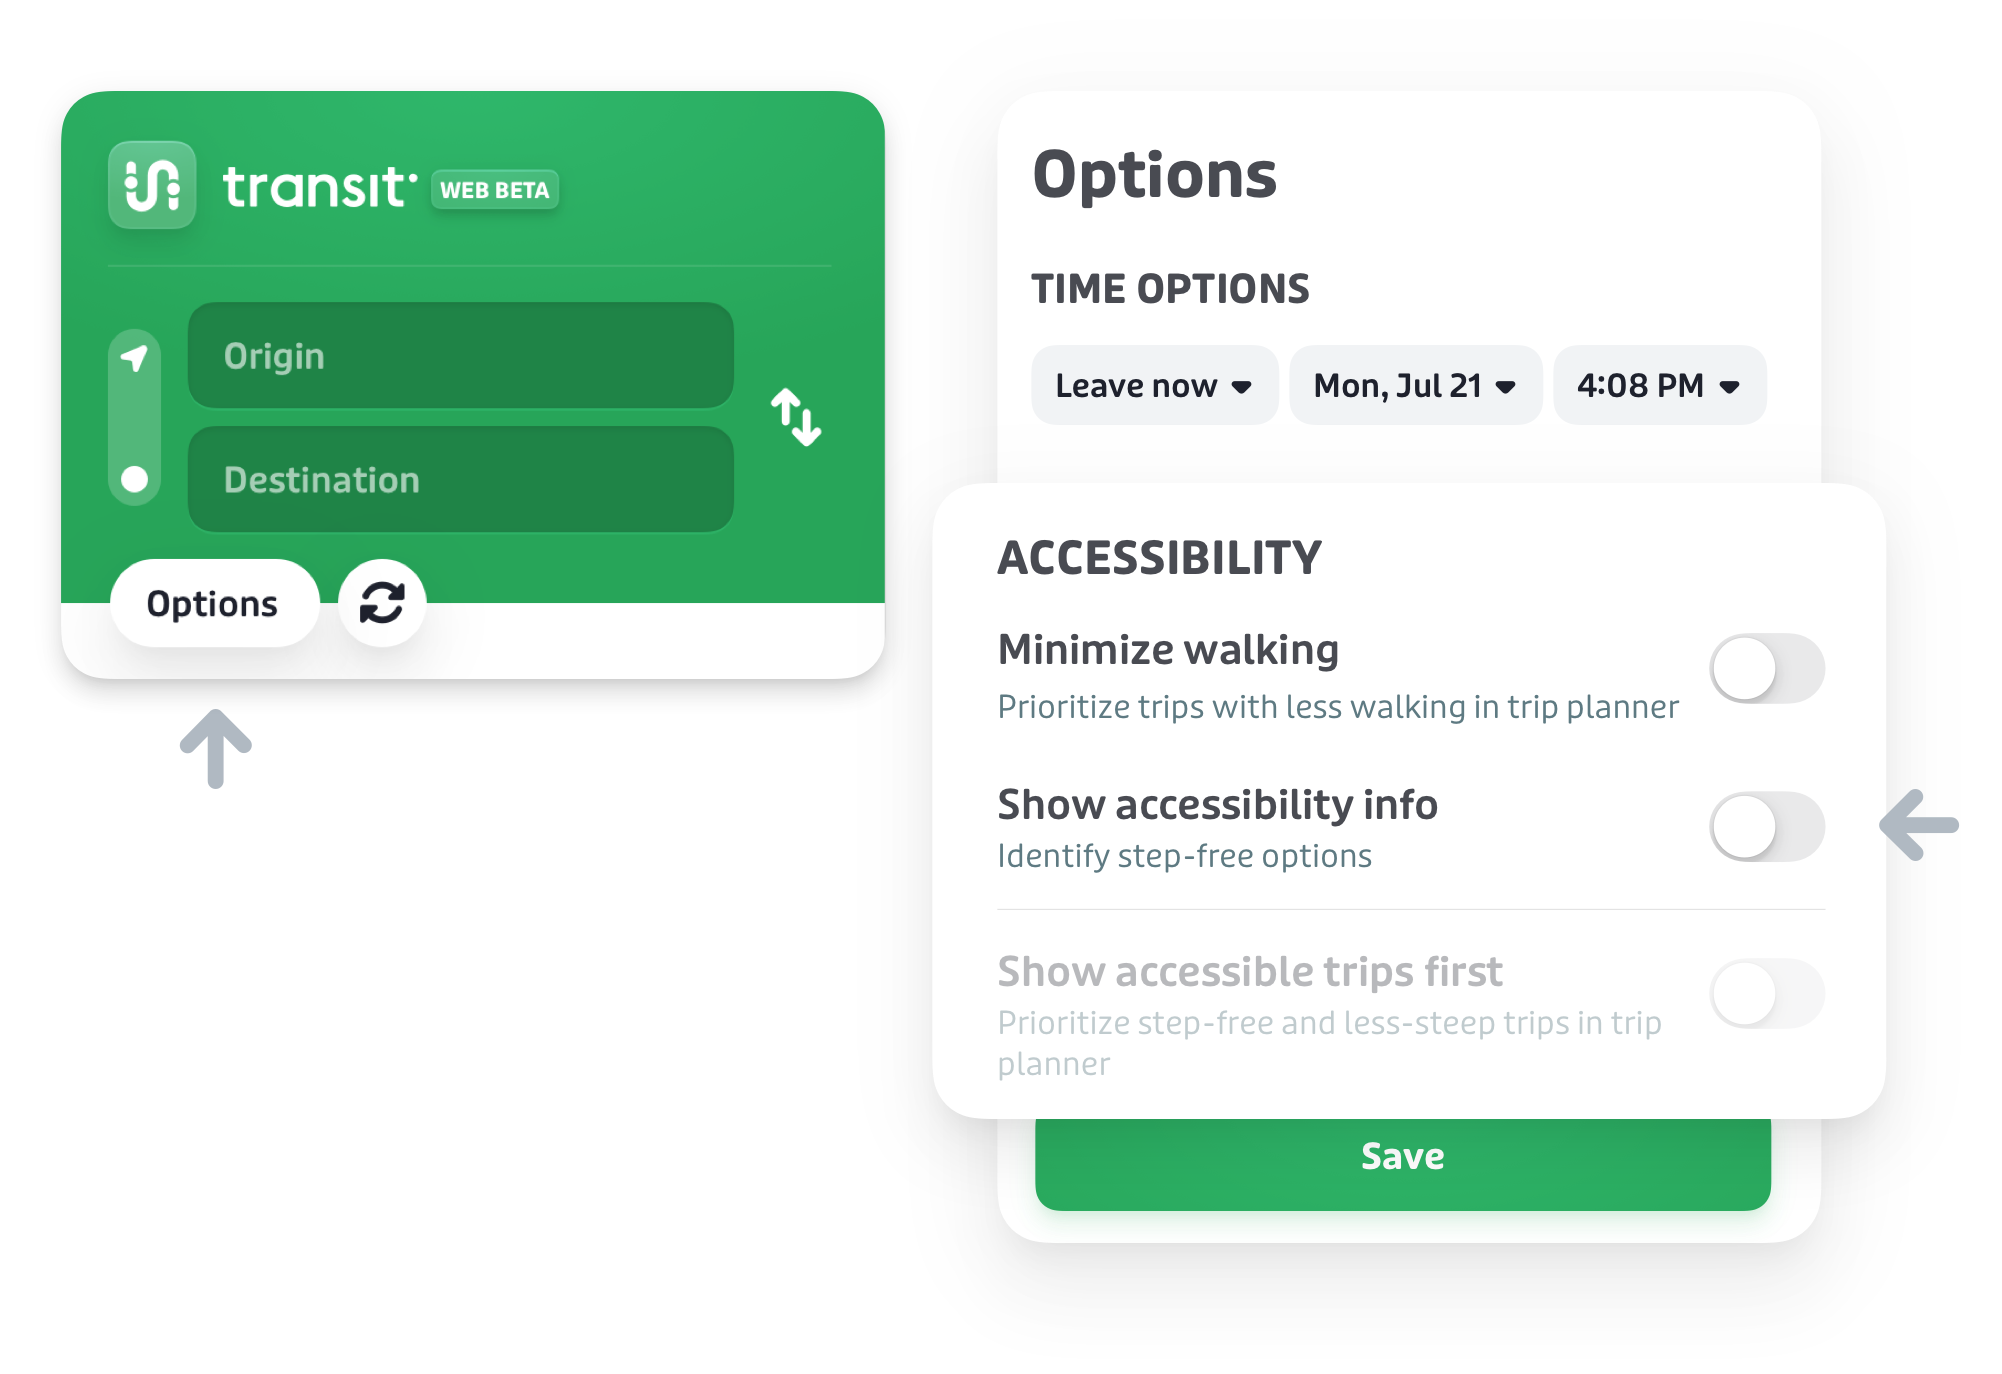
The options pane provides three options for accessibility parameters as you plan your journey, which influence the trip options it presents for you to choose from. All accessibility parameters are toggle-able on/off options.
- Minimize walking: select this option to prioritize tris with less walking in the trip planner
- Show accessibility info: select this option to display all available accessibility info for your transit system’s stops and stations. Note that showing accessibility info does not modify trip options that the web trip planner calculates; it is only an informational tool.
- Show accessible trips first: select this option to prioritize step-free and accessible trip options in the trip options generated by the trip planner.
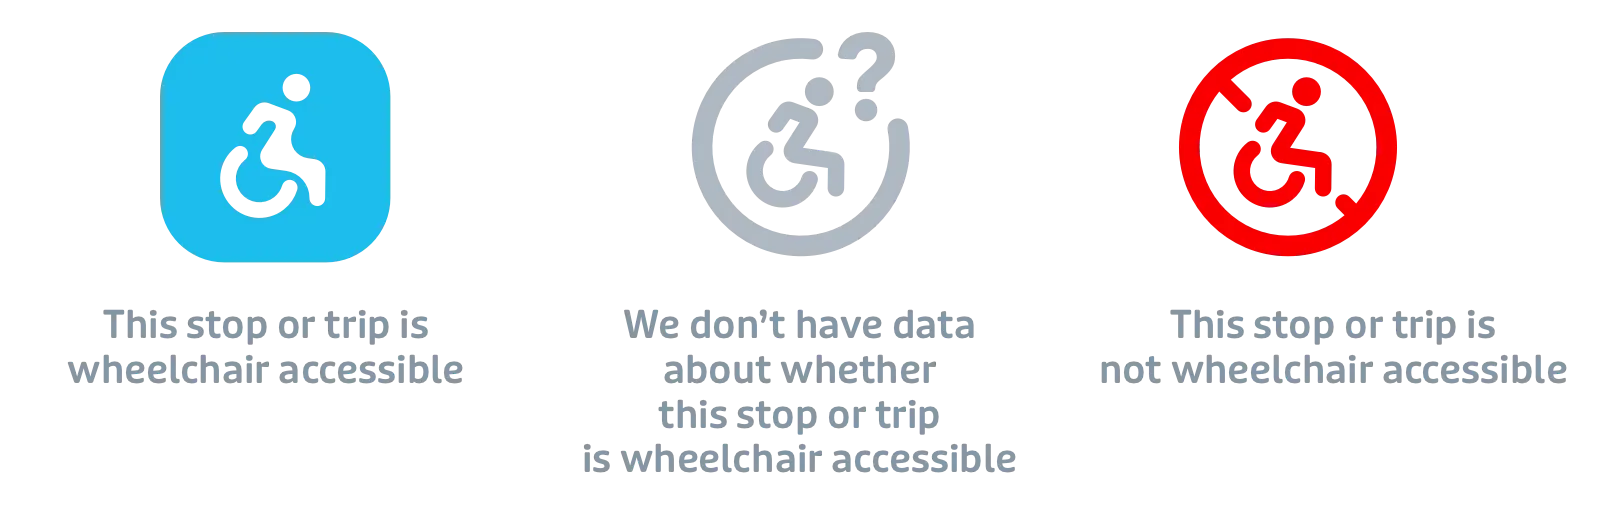
Here’s how accessibility info is displayed in the web trip planner:
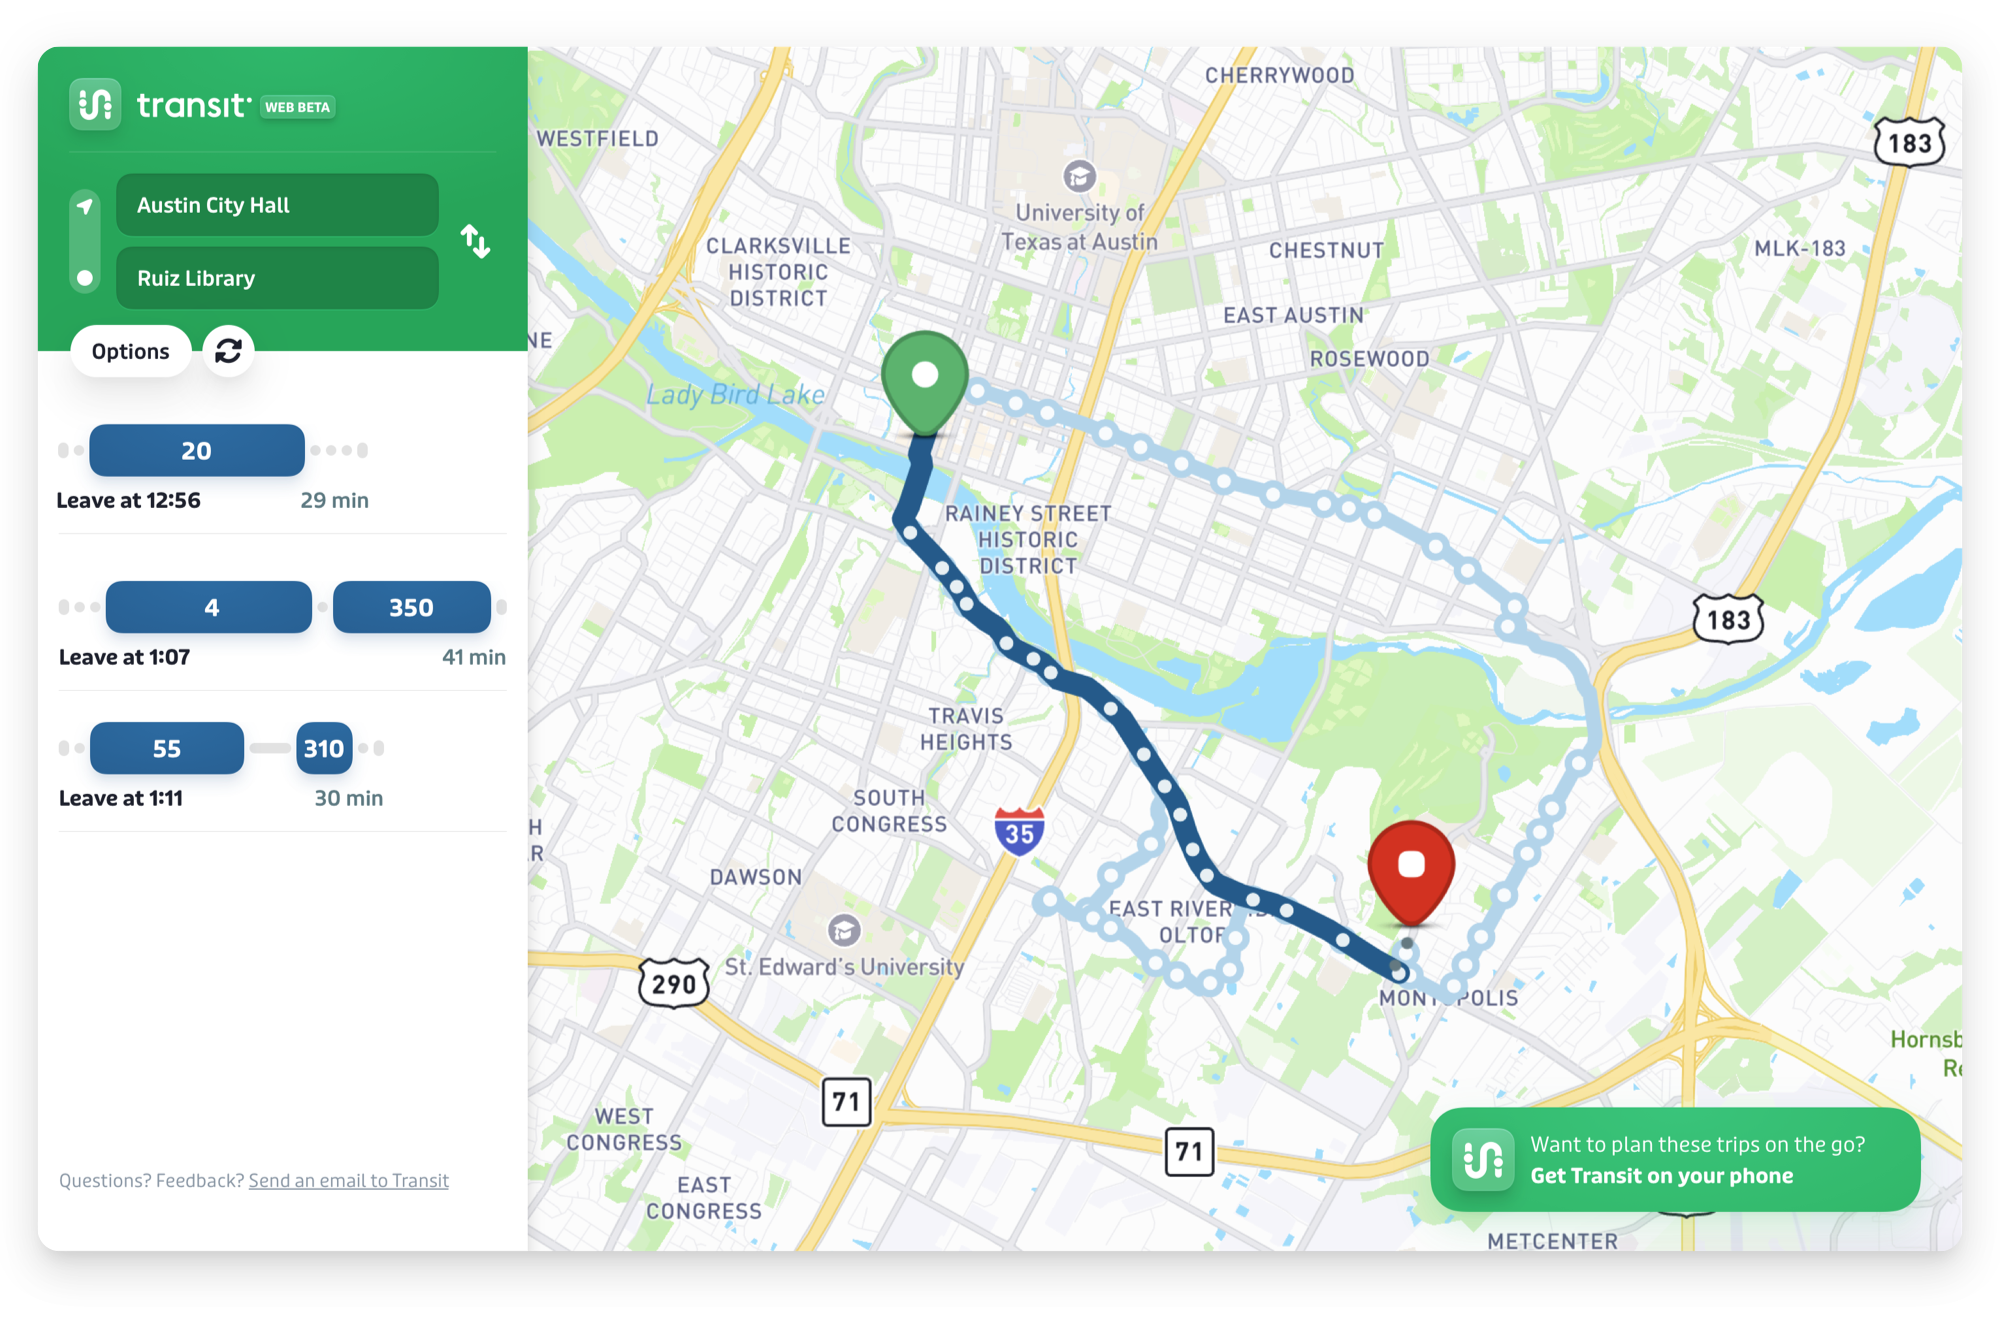
Compare your trip options
After defining your origin and destination, plus adjusting your departure time or accessibility options as needed, the trip planner will generate one or more trip options for your journey in the trip results list.
The best trip option is listed first, and alternatives are listed after. If necessary, scroll down to see the entire list.
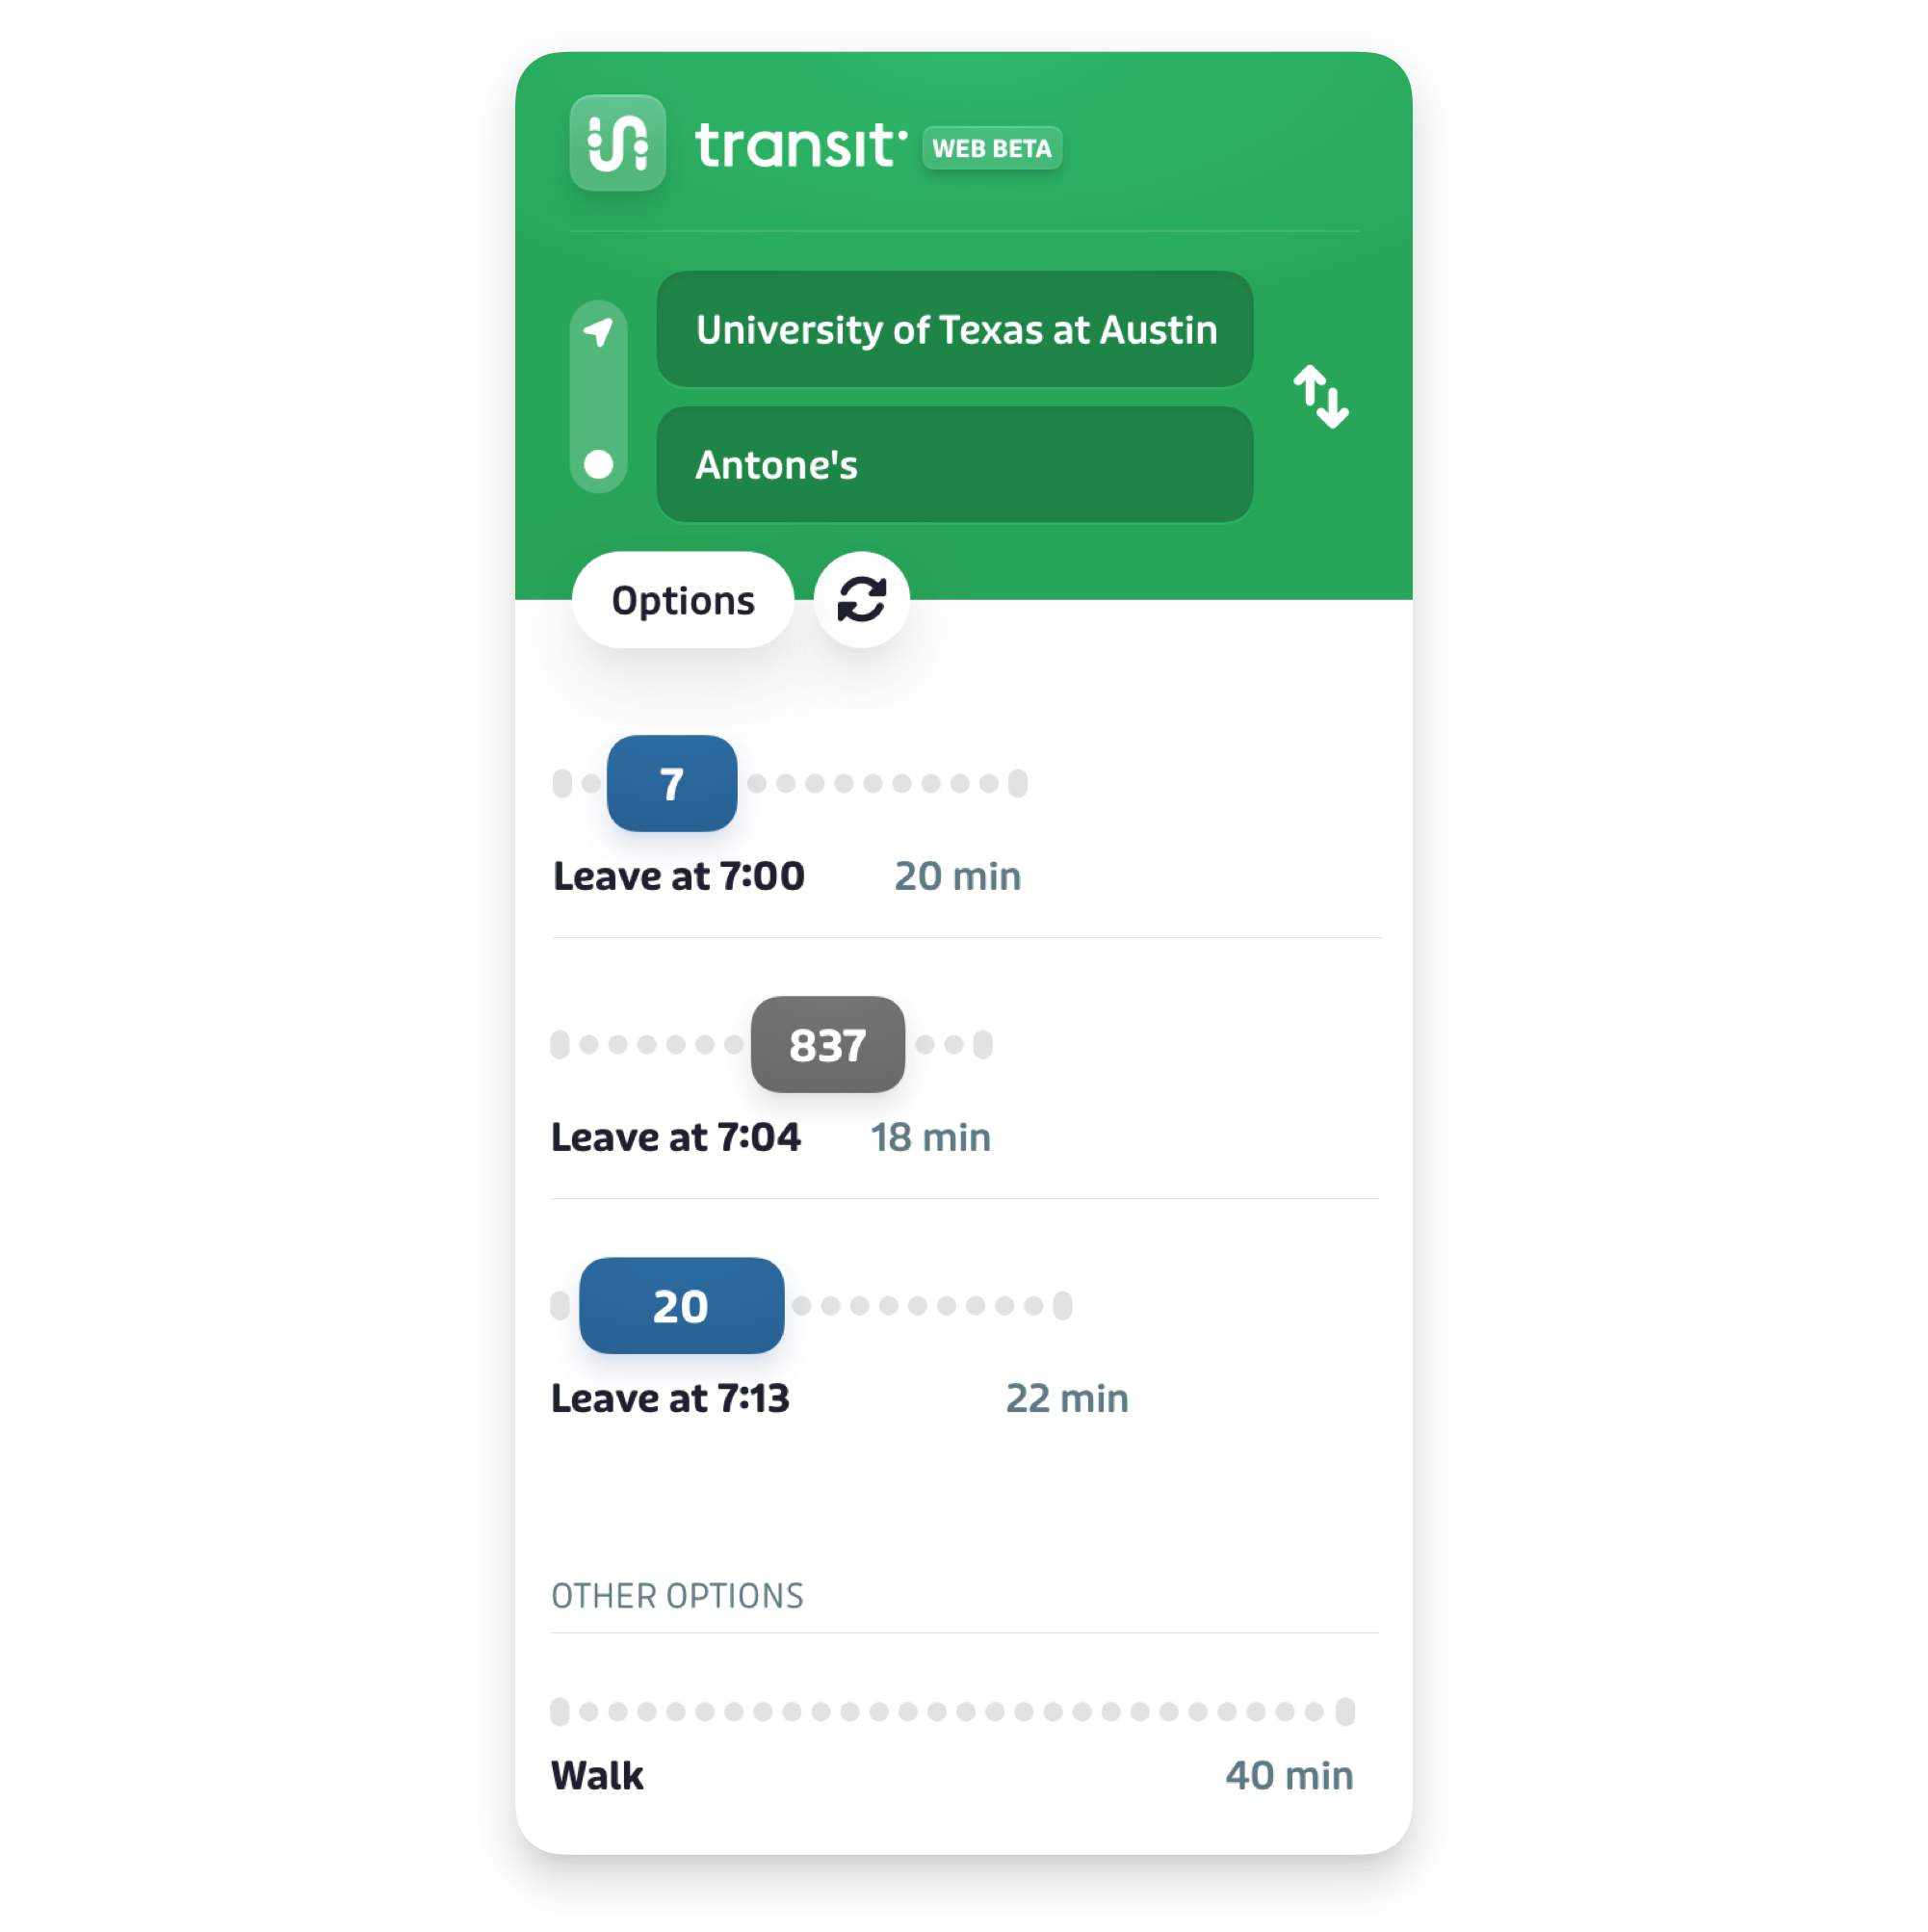
Note: the trip results may show trip options that use different transportation modes, including public-transit-only trips, trips that combine public transit segments with longer walk segments, and sometimes walking-only options as well.
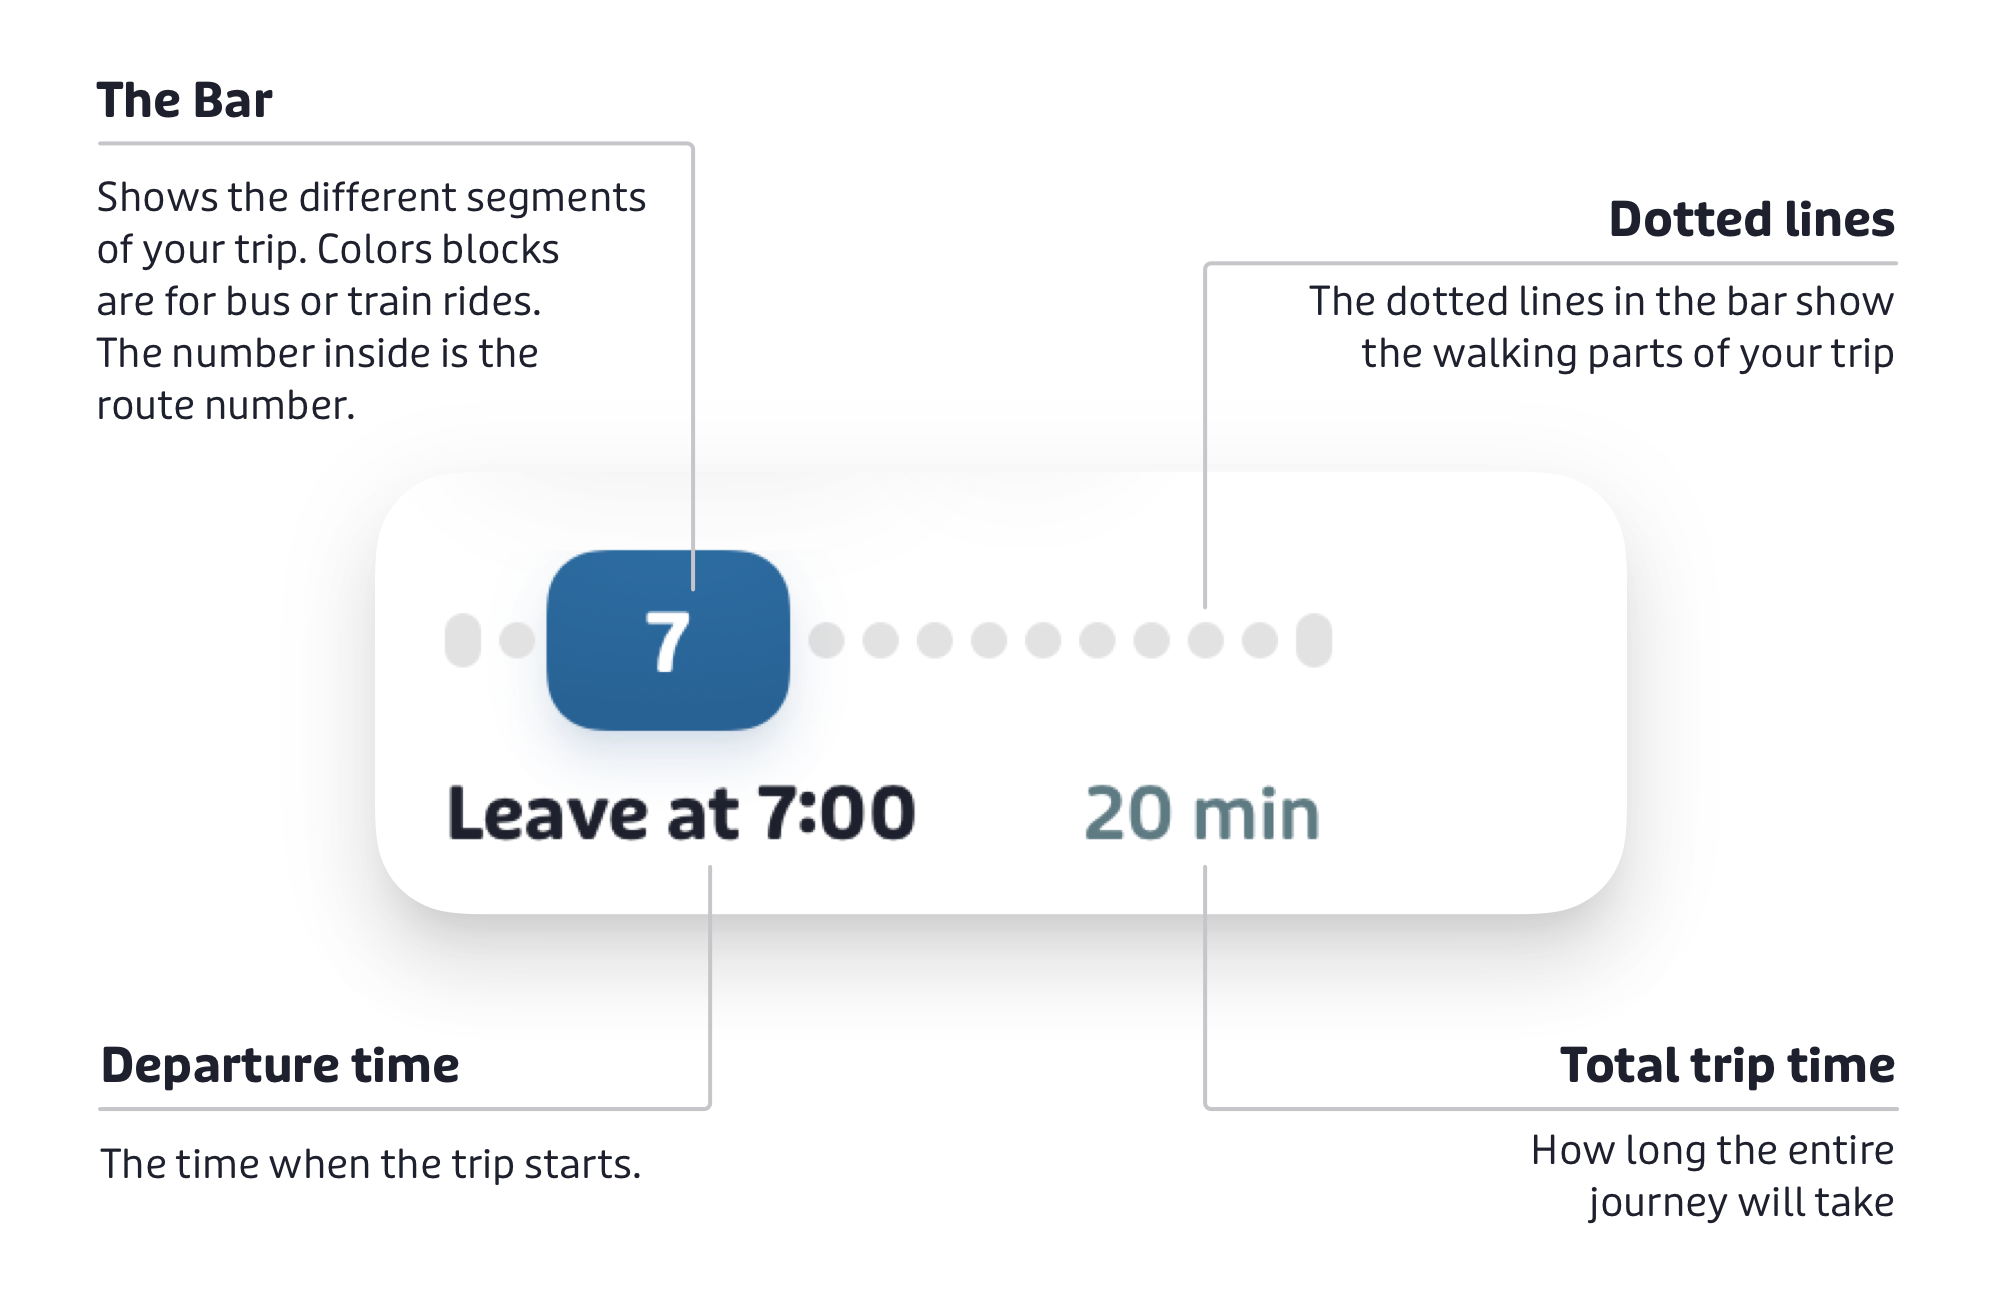
Each trip option is shown in a format called a "timebar", which gives you a quick visual summary of the journey:
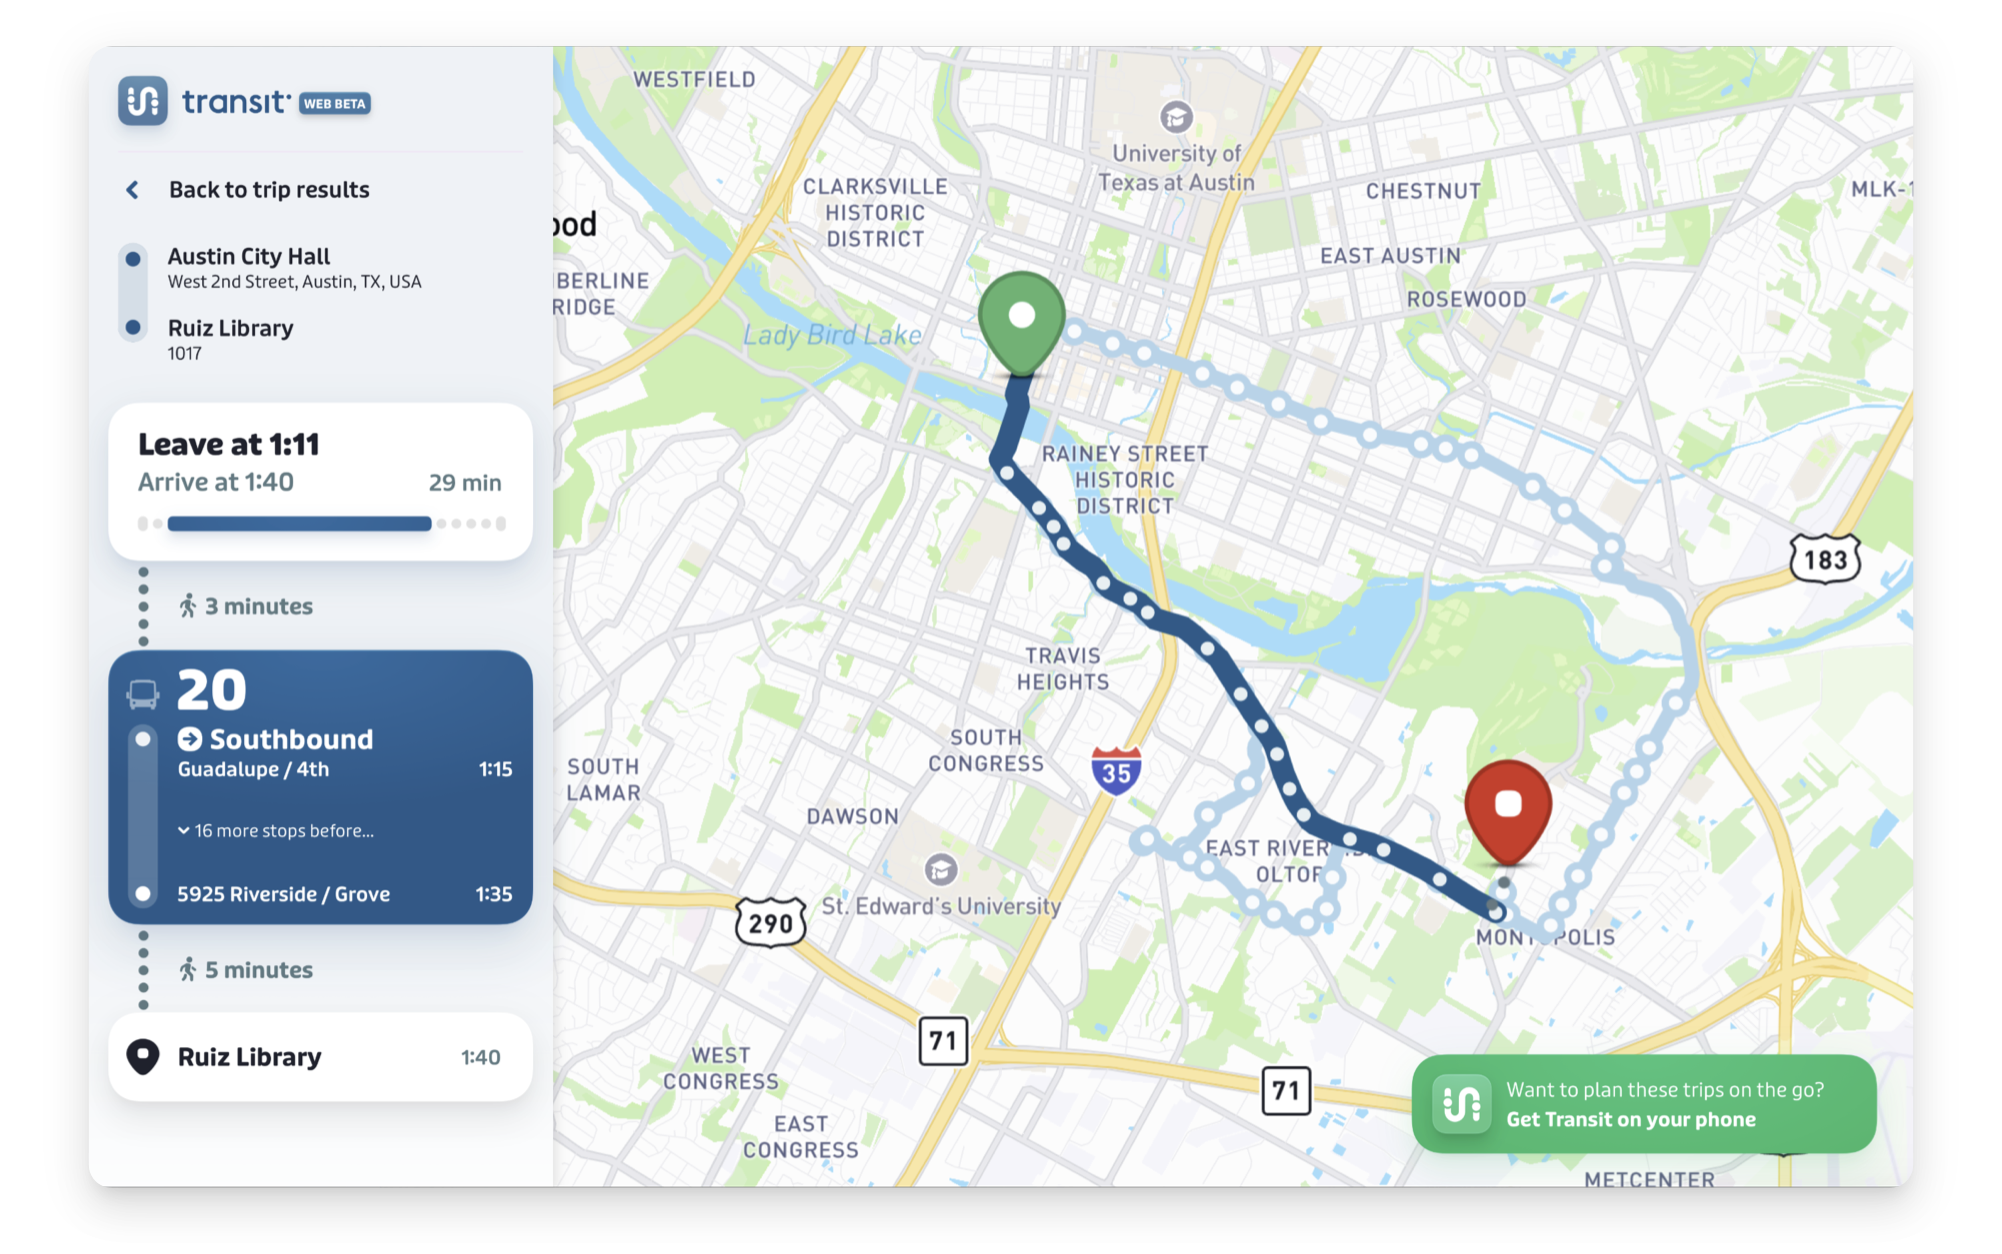
How to check trip details
To get more information about a specific trip, you can open the details view.
- From the list of trip results, find a trip you are interested in.
- Then, click anywhere on that trip's timebar. A detailed, step-by-step list for that single trip will be displayed.
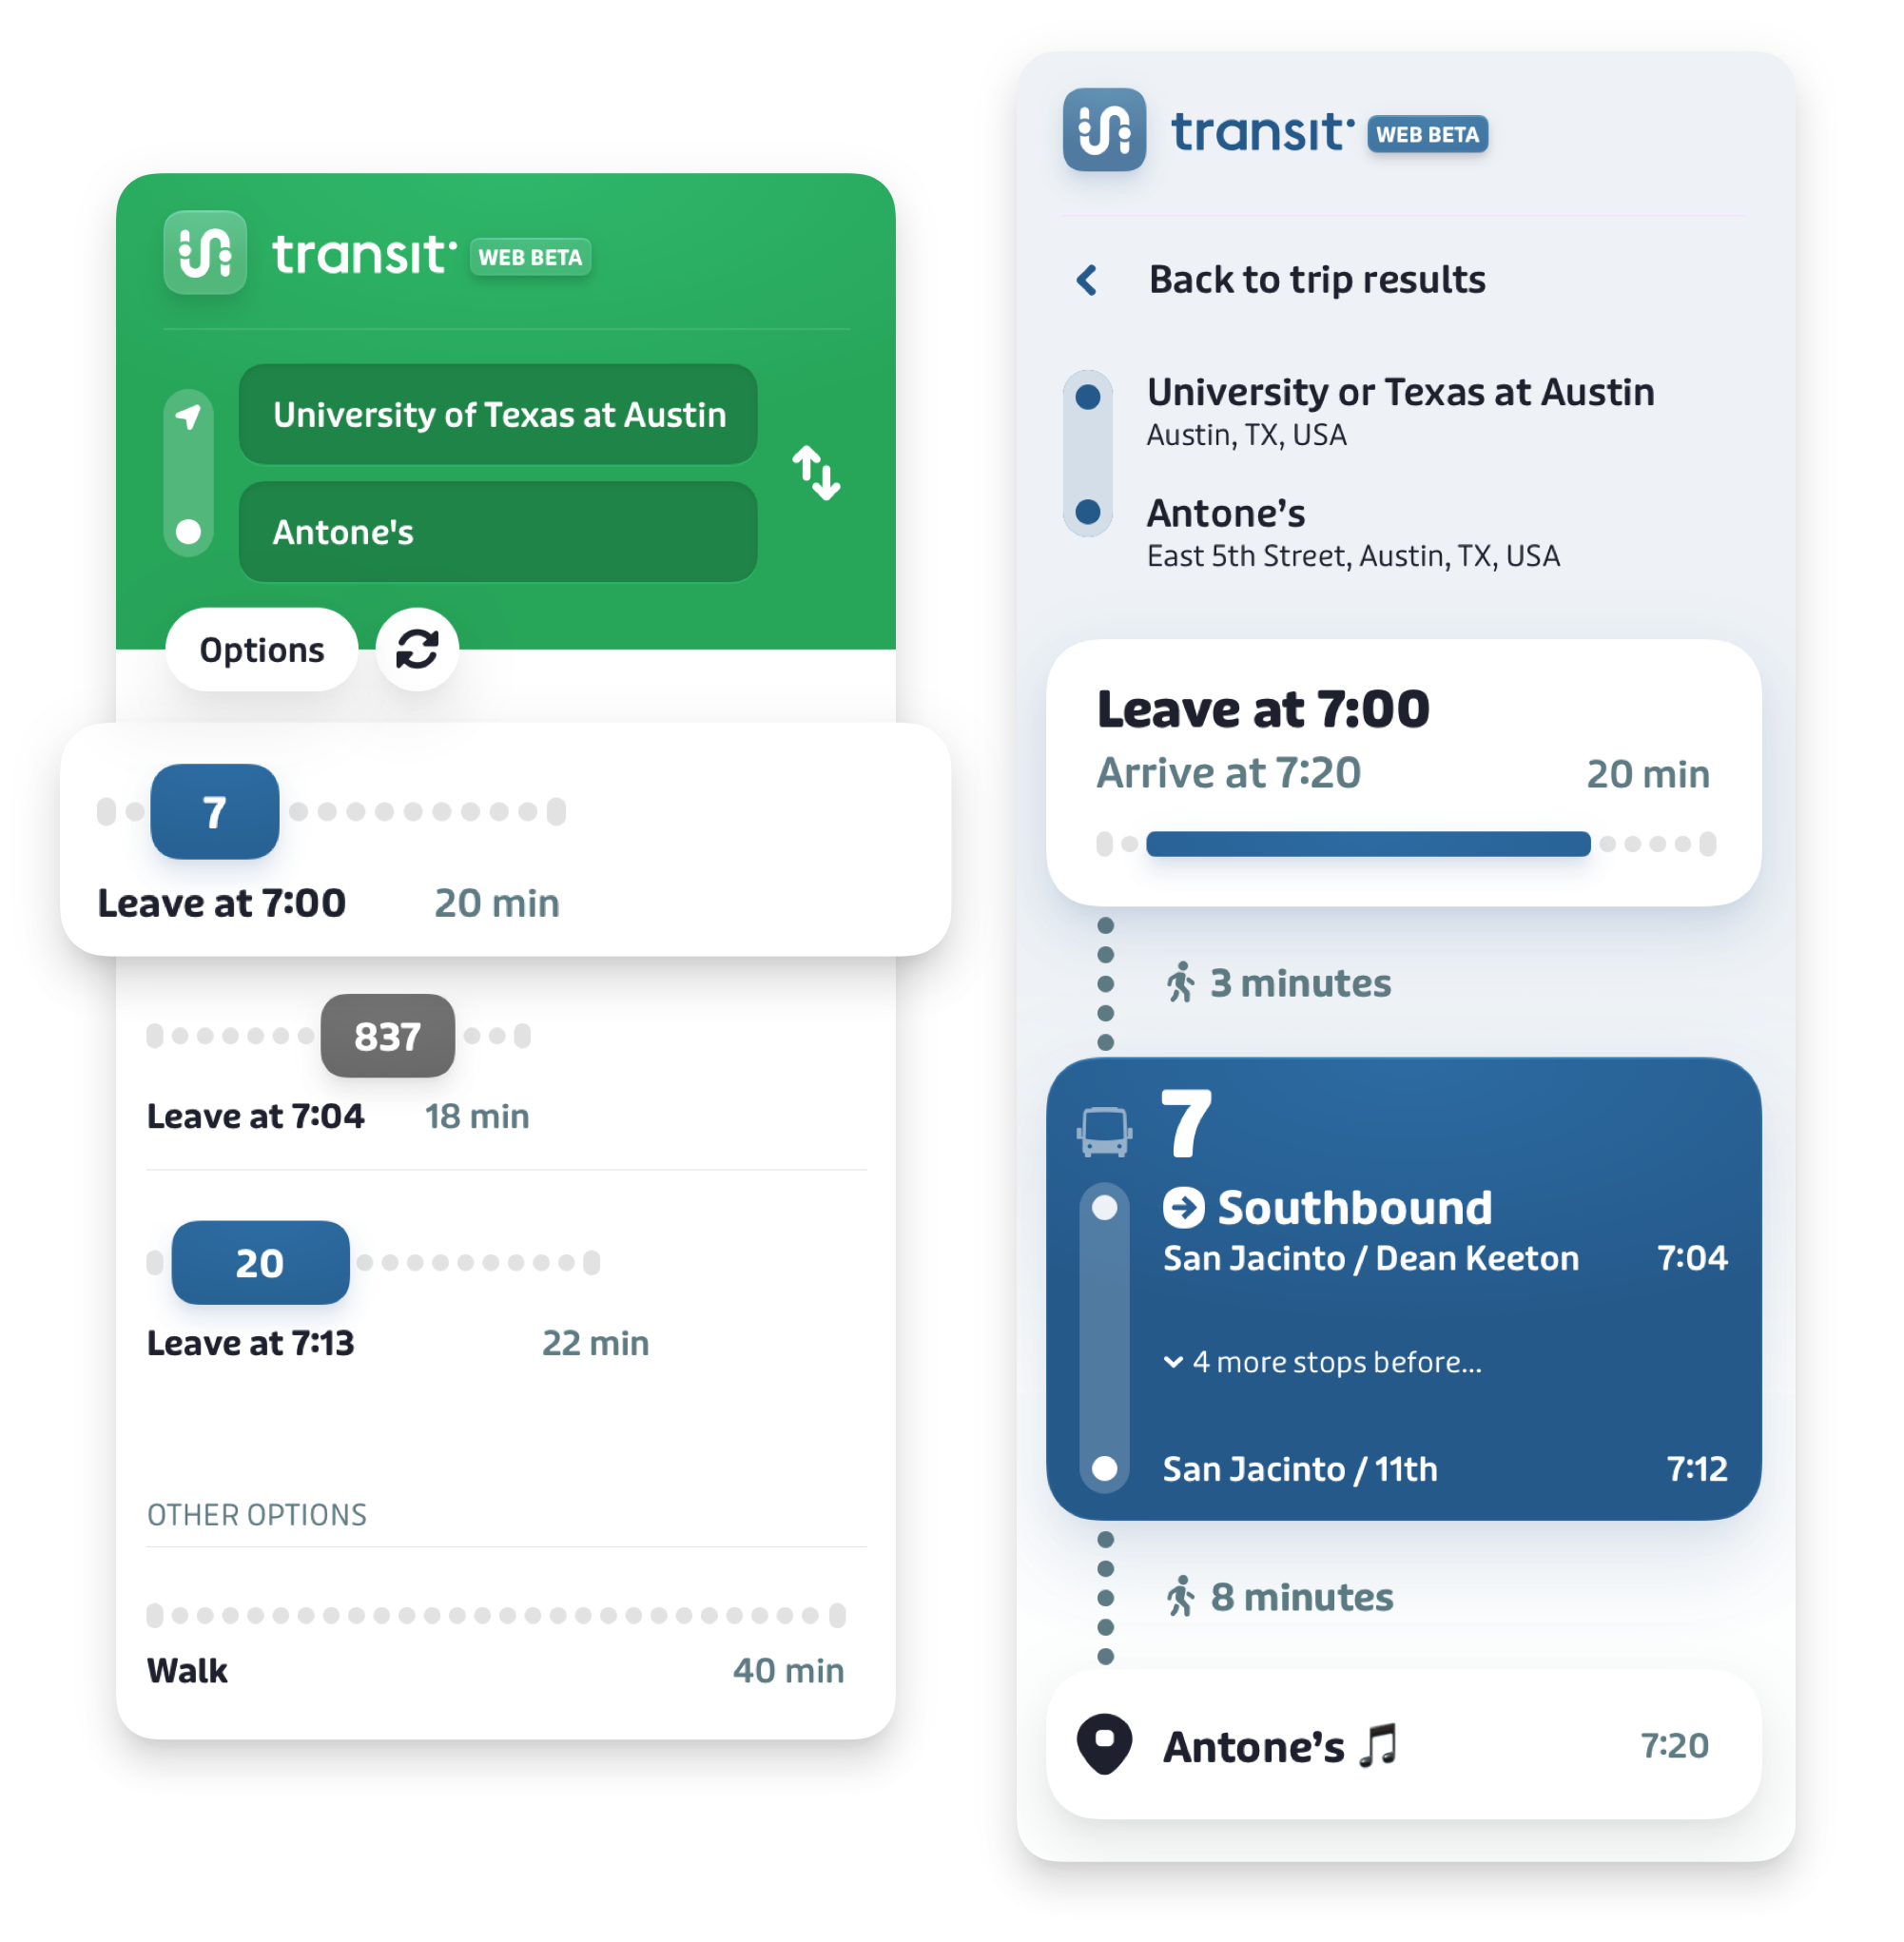
The details view shows you where to get on and off a bus or train. You can also see all the stops in between.
To do so, click on the line of text between the boarding and drop-off steps that says "[x] more stops before…"
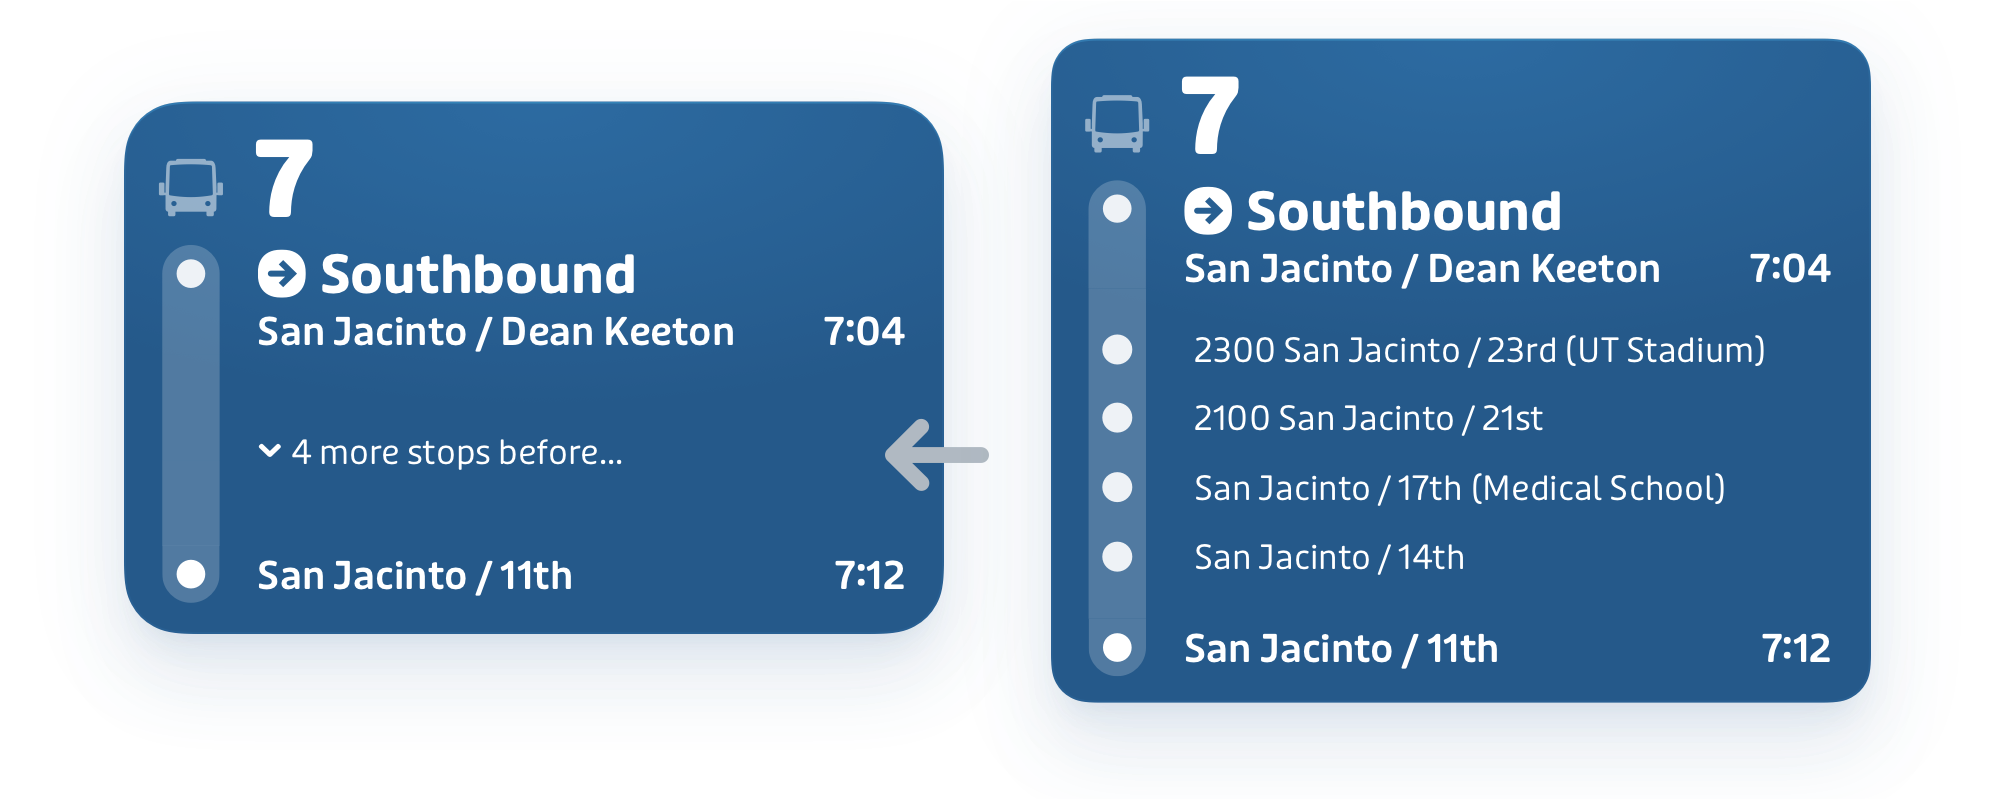
The view will expand to show you a list of every stop the vehicle will make before you need to get off. You can click it again to hide the list.
More helpful features
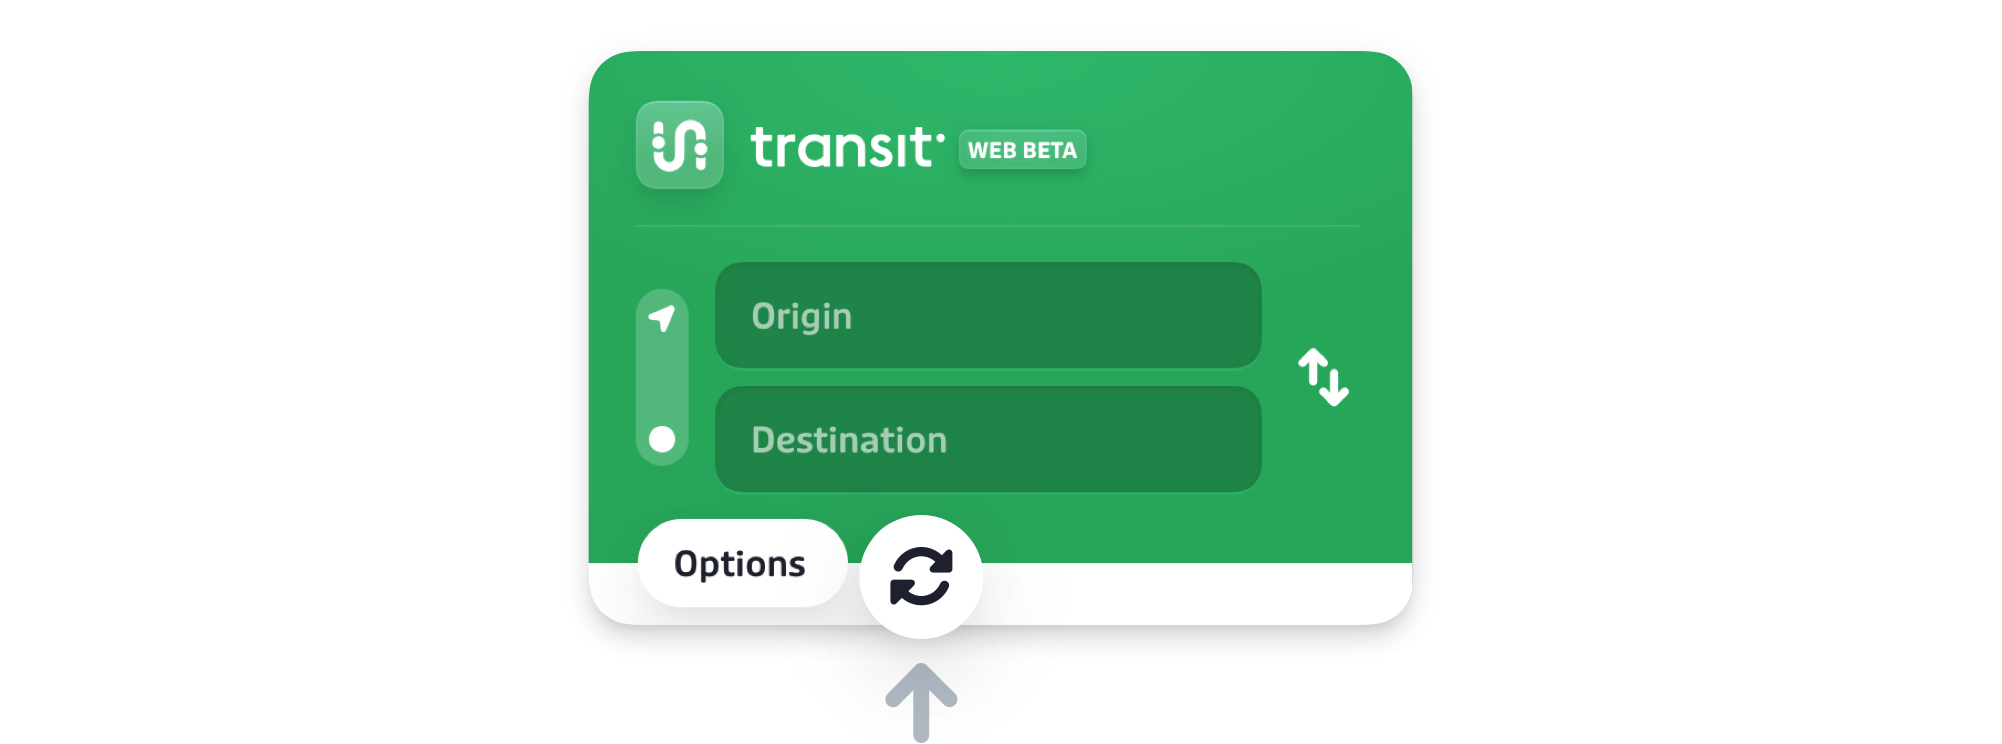
Refresh your trip results
Information about vehicle locations and arrival times are updated often. You can use the refresh button to get the latest updates.
How to refresh your results:
- Find the refresh button in the planning panel. It looks like a circular arrow.
-
Click the refresh button. The trip planner will search again using the most current information. The trip times in your results list may change slightly.
Share your trip results with someone
You can share your trip plans with another person by sending them a link.
How to share your trips:
- After you have a set of trip plans you want to share, move your mouse to the address bar at the very top of your web browser. Click inside it. The full web address for the page will be highlighted.
- Copy this address. You can do this by right-clicking on it and choosing "Copy", or by using a keyboard shortcut.
- Paste the link into an email or a message to send it. When the other person clicks the link, the Trip Planner will open on their computer showing the exact set of trip plans you created.
Common questions & troubleshooting
I can't find the address I’m looking for
Sometimes, the address you type might not show up in the suggestion list. Here are a few things you can try.
- Check for typos. Make sure you have spelled the street name and city correctly.
- Try a different format. For example, if "123 Main Street" does not work, try typing "Main Street and 2nd Avenue".
- Use a nearby landmark. If you are going to a specific store, try typing the name of the store or the shopping center it is in.
- Use the map. You can also select your location directly on the map instead of typing it. (See "Define origin or destination location by cliking on the interactive map").
No trip results are shown
If you have entered an origin and destination but see a message that no trips could be found, here are some things to check.
- Check the date and time. Make sure you have not accidentally chosen a date in the past, too far in the future, or a time when transit service is not running (like in the middle of the night).
- Check the locations. Are the origin and destination very far apart? The trip planner may not be able to find a route if the trip is too long. Make sure the pins on the map are where you expect them to be.
- Try a different time. If you chose "Leave at" or "Arrive by", try changing the time by 15 or 30 minutes. There may not be a trip available at the exact time you first selected.
My trip times changed
You may notice that the departure times in your trip plan change if you wait a few minutes and then look again.
This happens because the trip planner is using real-time information. This means it is getting live updates about where your bus or train is right now.
- If a bus is running a few minutes late, the trip planner will update its arrival time at your stop.
- If a bus is running early, the time might change as well.
- Using the refresh button is a good way to make sure you have the most current times before you leave.
My trip plan is taking a long time to load
Sometimes, it may take a little longer for your trip results to appear after you enter your destination.
This can happen when the trip planner is looking for many different types of trips at once, especially trips that include On-Demand services. The planner is working hard to check all possible options to find you the best one.
Usually, the first few results will appear quickly, and more options may fill in after a few more seconds.